

Collect buyer details from your customers
Email each UAE customer a form that holds the details you already have, let them confirm and complete it, then move the confirmed records to your Buyers master. You need a customer export from your ERP with a customer code and a contact email for every customer.
A UAE e-invoice needs details about the buyer that an ERP often does not hold, such as a Peppol ID (the buyer’s address for receiving e-invoices), a registration number or an emirate. Buyer data collection gets those details from the customers themselves:
- You upload your customer list.
- Each customer gets a link to a form. What is in your file is already filled in, so they check it and add what is missing.
- Answers that only fill a gap are accepted for you. You decide on the ones that replace a key detail from your file.
- You move the confirmed customers to the Buyers master, the Buyers catalog in Masters, where document forms reuse them.
Upload your customer export
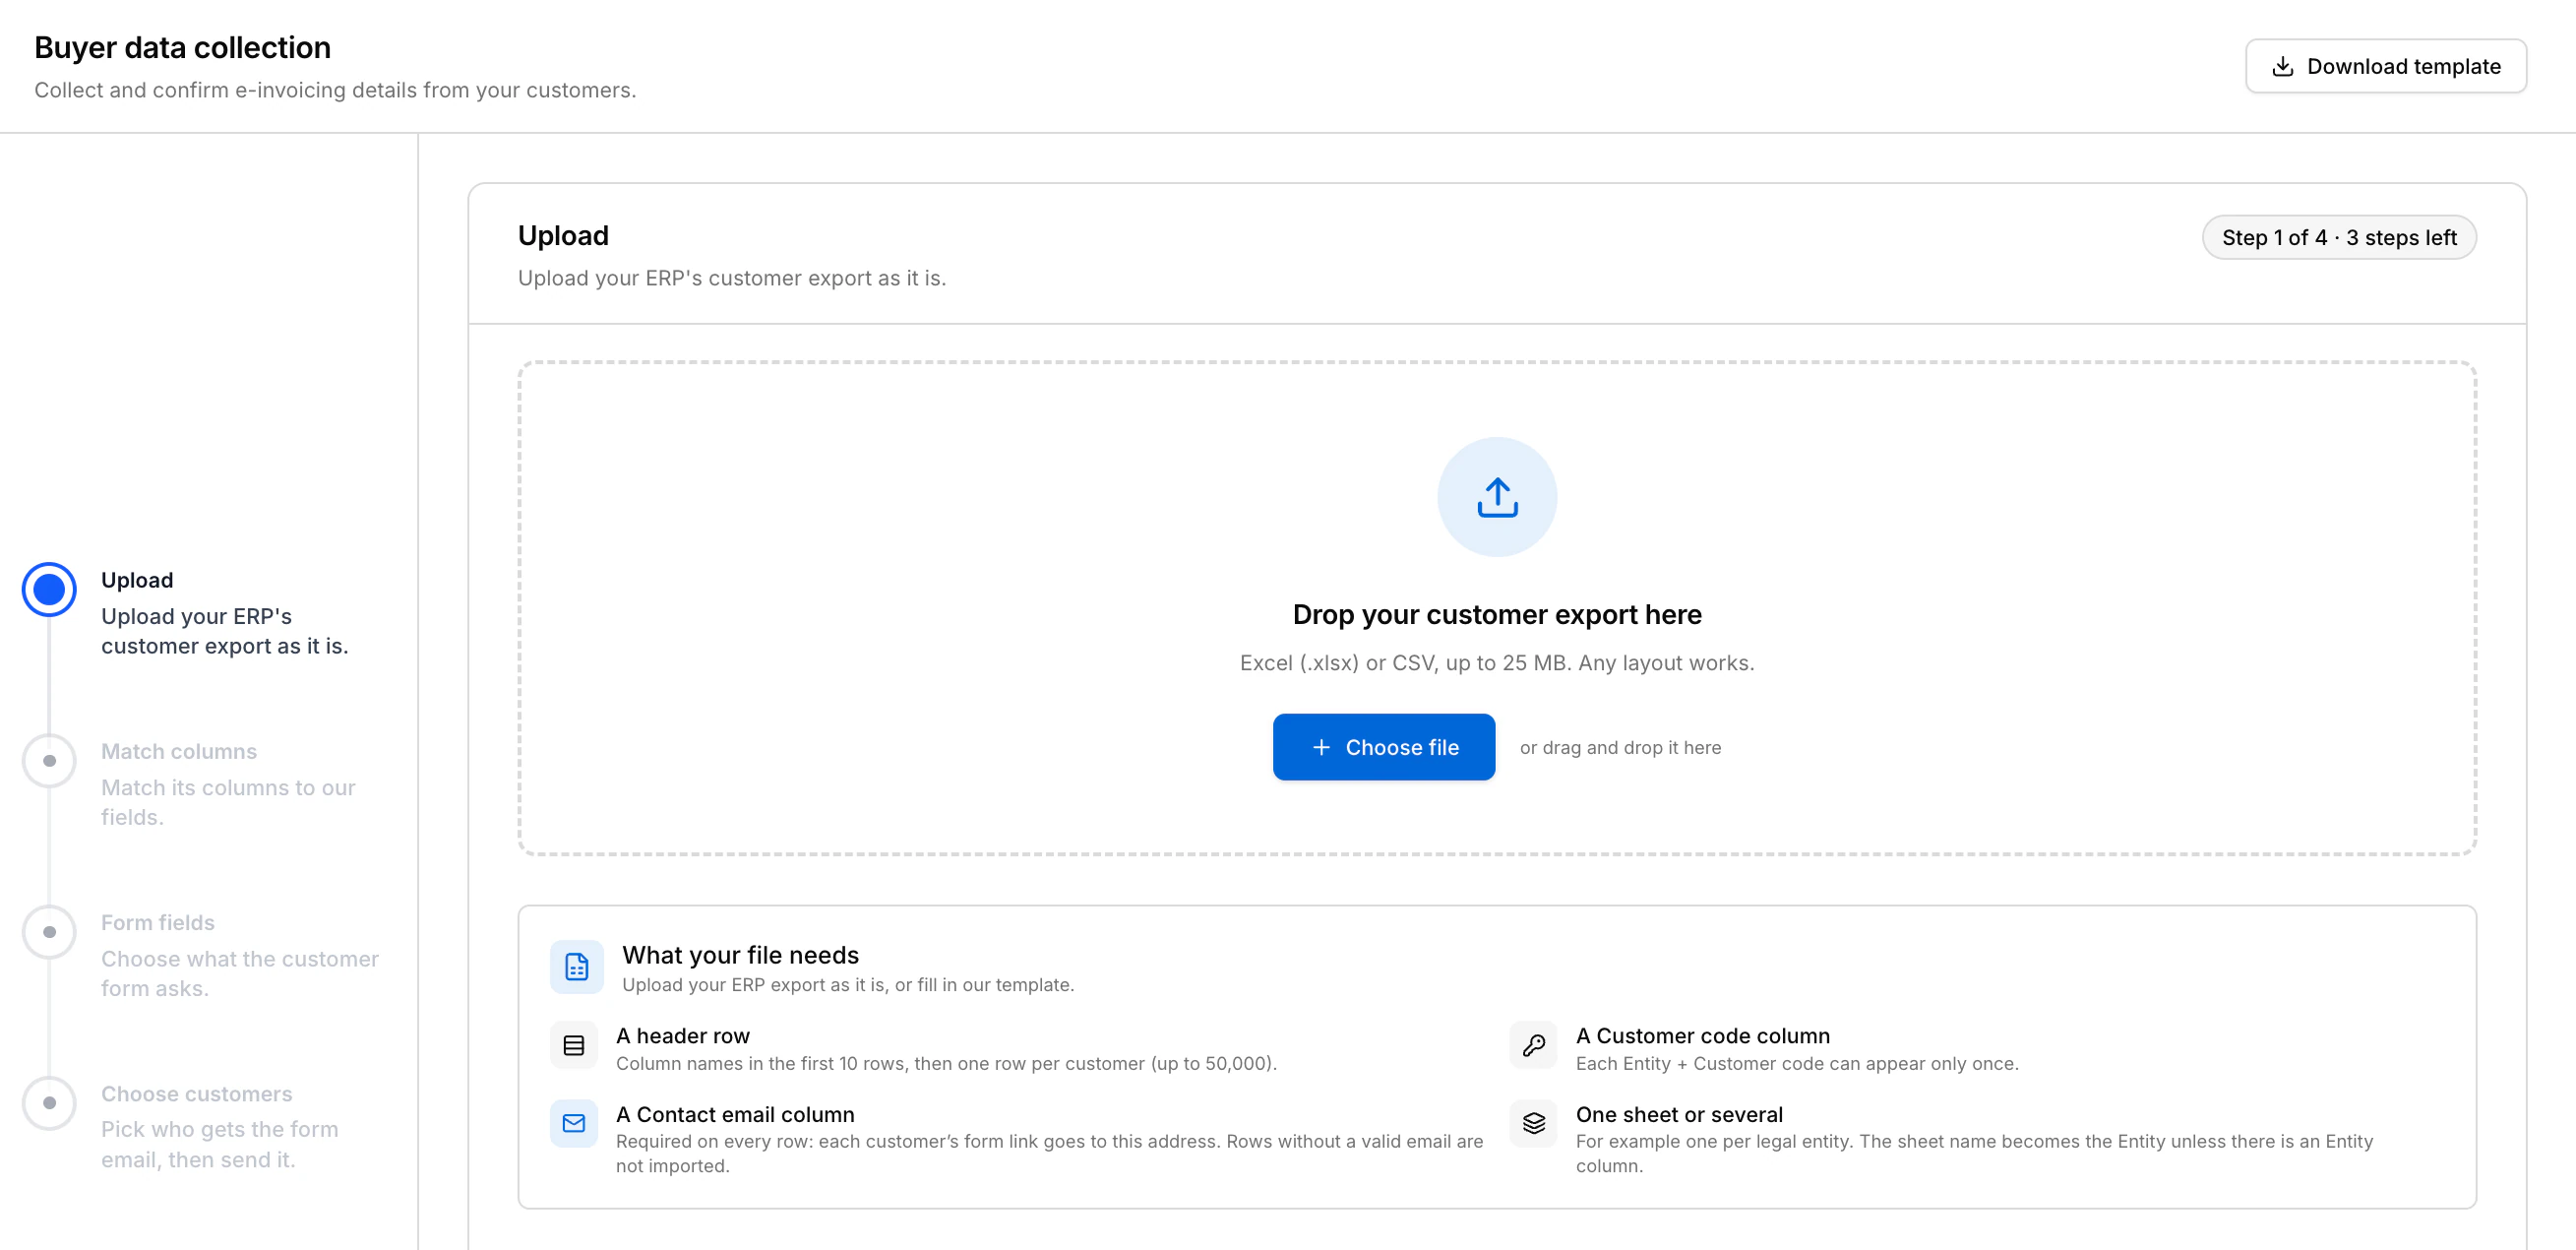
In the Invoice Portal, expand Masters and choose Buyer data collection. Drop your file on the page, or choose Choose file.
Your file needs:
| Requirement | Detail |
|---|---|
| A header row | Column names somewhere in the first 10 rows, then one row per customer. |
| A customer code column | Your ERP’s ID for the customer. Each Entity and customer code pair can appear only once. |
| A contact email column | Required on every row. The customer’s form link goes to this address. Rows without a valid email are not imported. |
| One sheet or several | For example, one sheet per legal entity. |
When the file is read, the page shows its name with the number of sheets and rows, for example 1 sheet · 8 rows read. Choose Replace file if it is the wrong one. Nothing is saved yet. Choose Next.
Match your columns
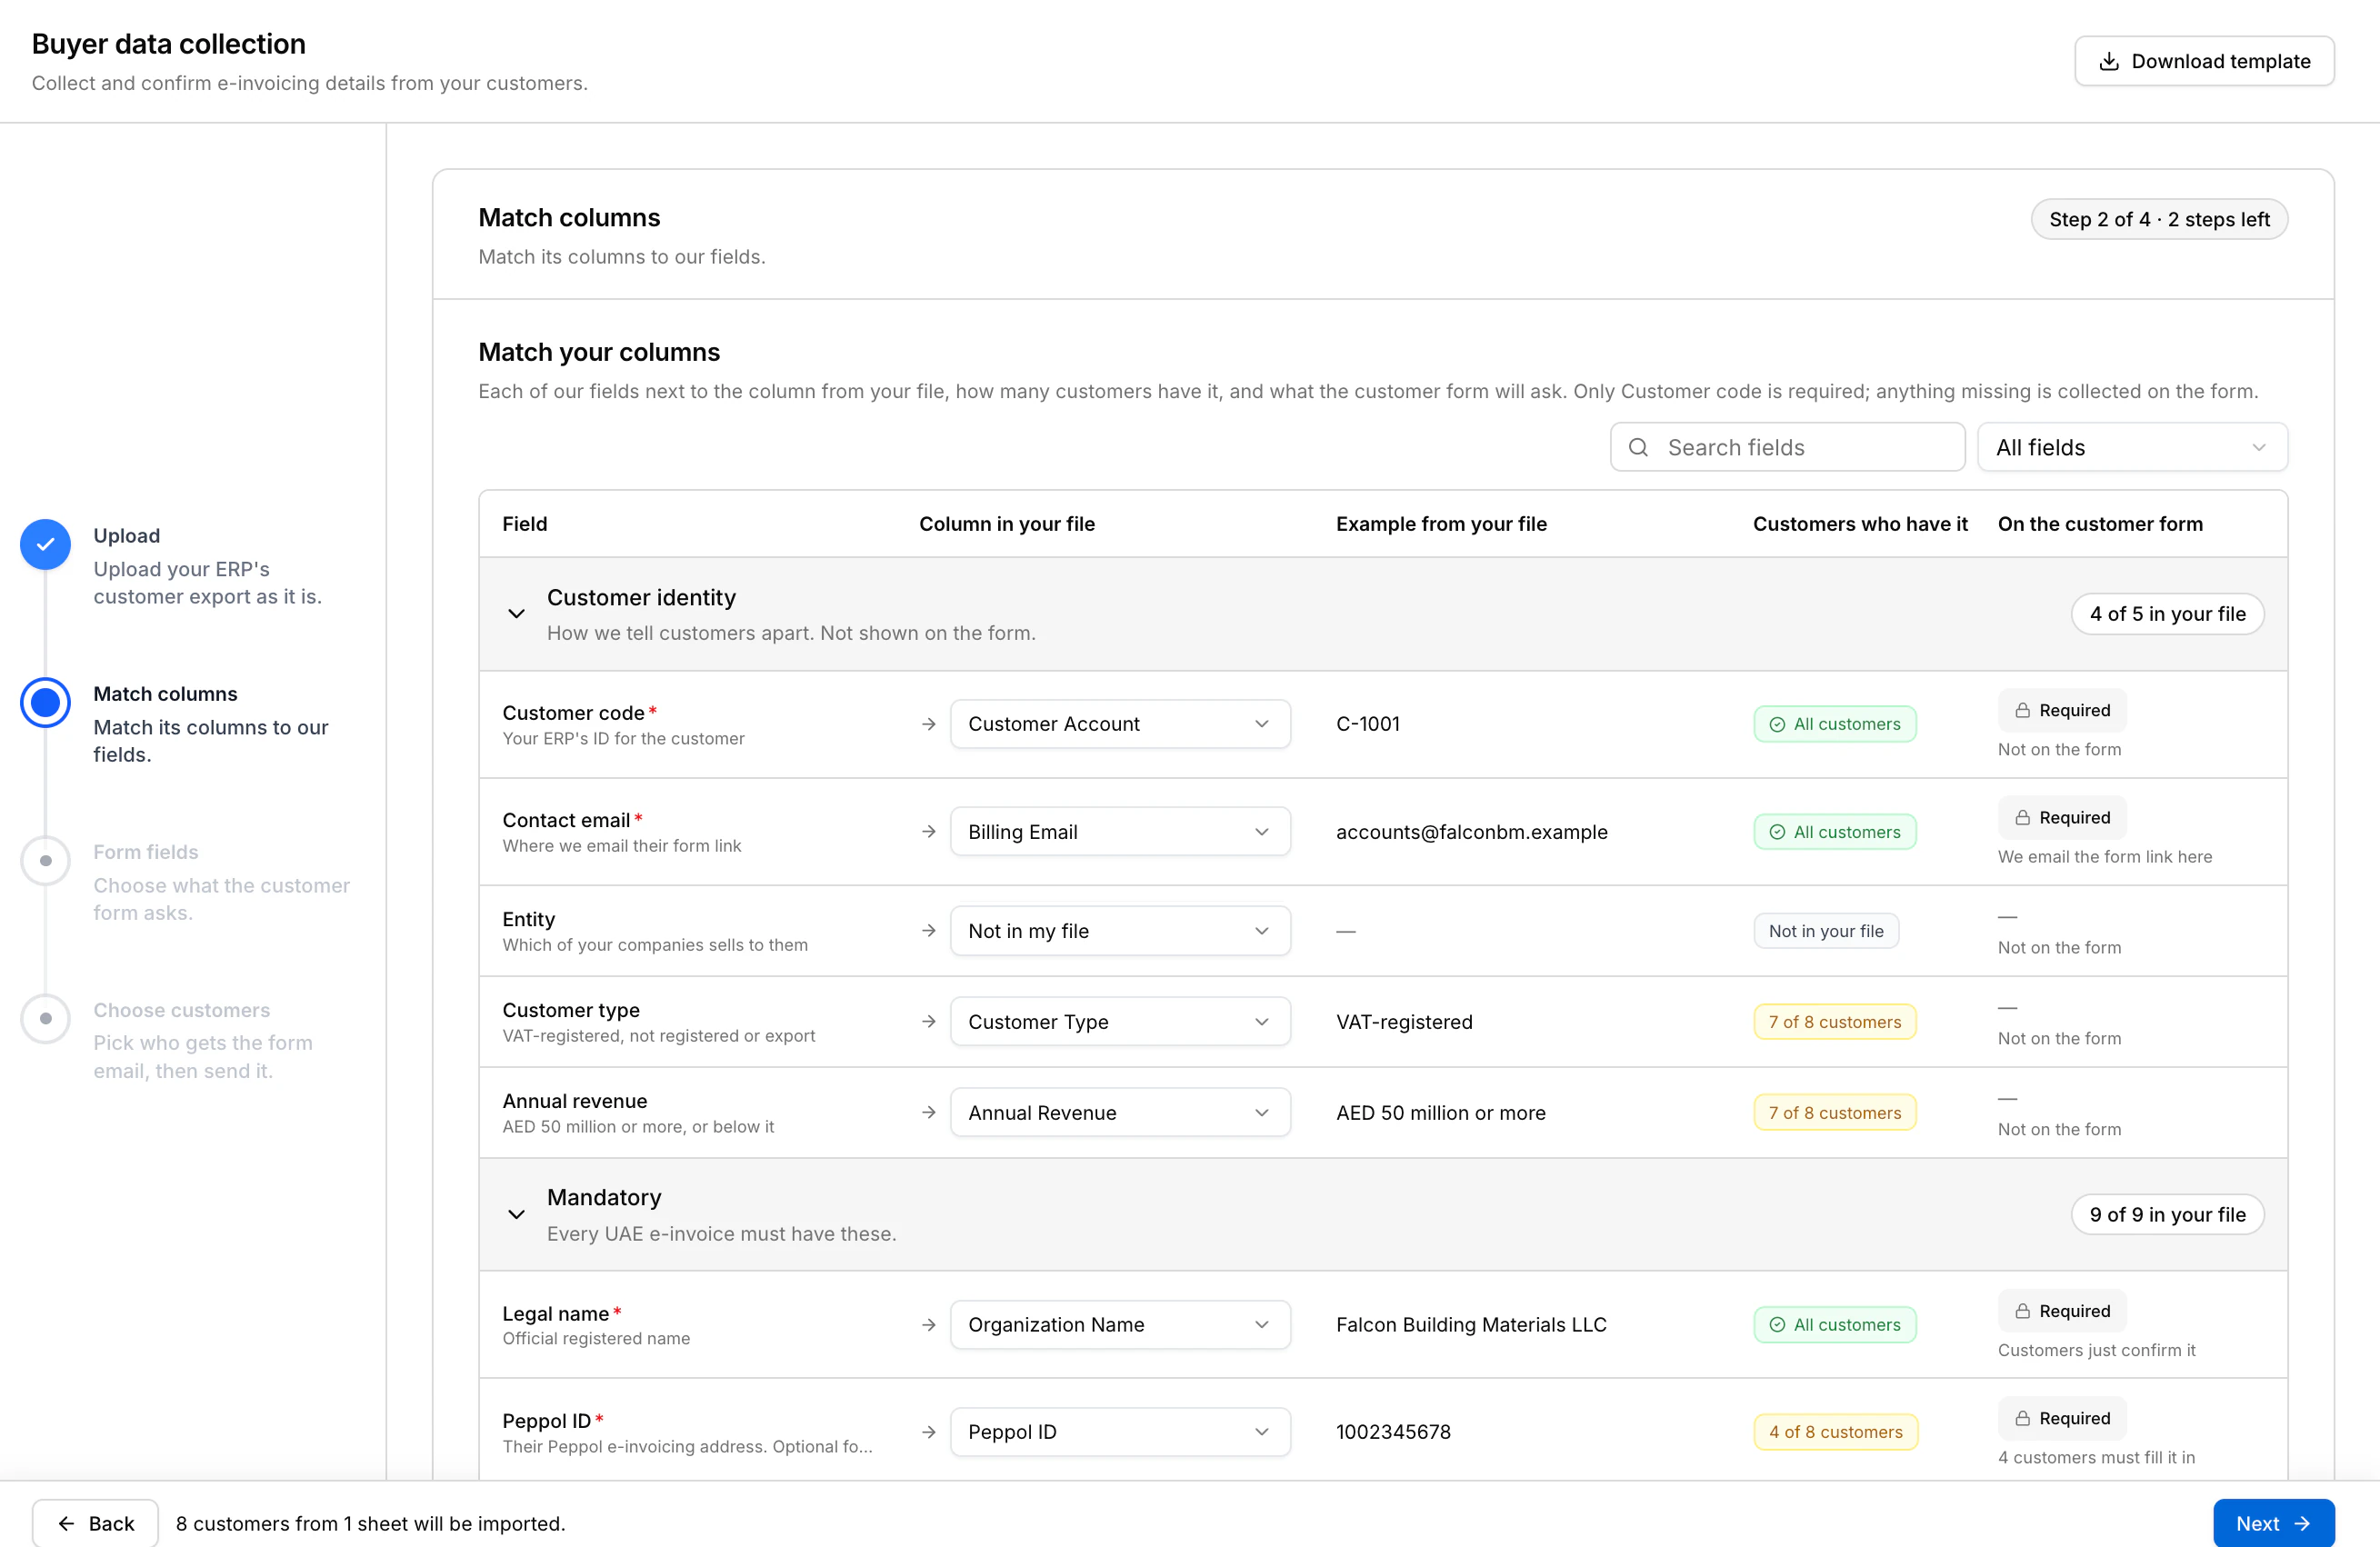
Match your columns lists each field next to the column it found in your file, with an example value. Check the suggestions. To change one, open the list under Column in your file and choose another column, or Not in my file.
- Customer code and Contact email must be matched before you can continue.
- Entity says which of your companies sells to the customer. When the file has several sheets, you can choose Use the sheet name.
- Customer type and Annual revenue decide which fields a customer must fill. The customer confirms both on the form, or chooses them if your file does not have them.
- A field you leave as Not in my file has nothing to pre-fill. If the form asks for it, the customer fills it in.
Customers who have it shows how complete each column is. On the customer form shows what the form will do with the field, such as Customers just confirm it or 4 customers must fill it in.
The footer says how many customers will be imported. Choose Next to import them. A message confirms the count and how many rows were skipped.
Choose what the form asks
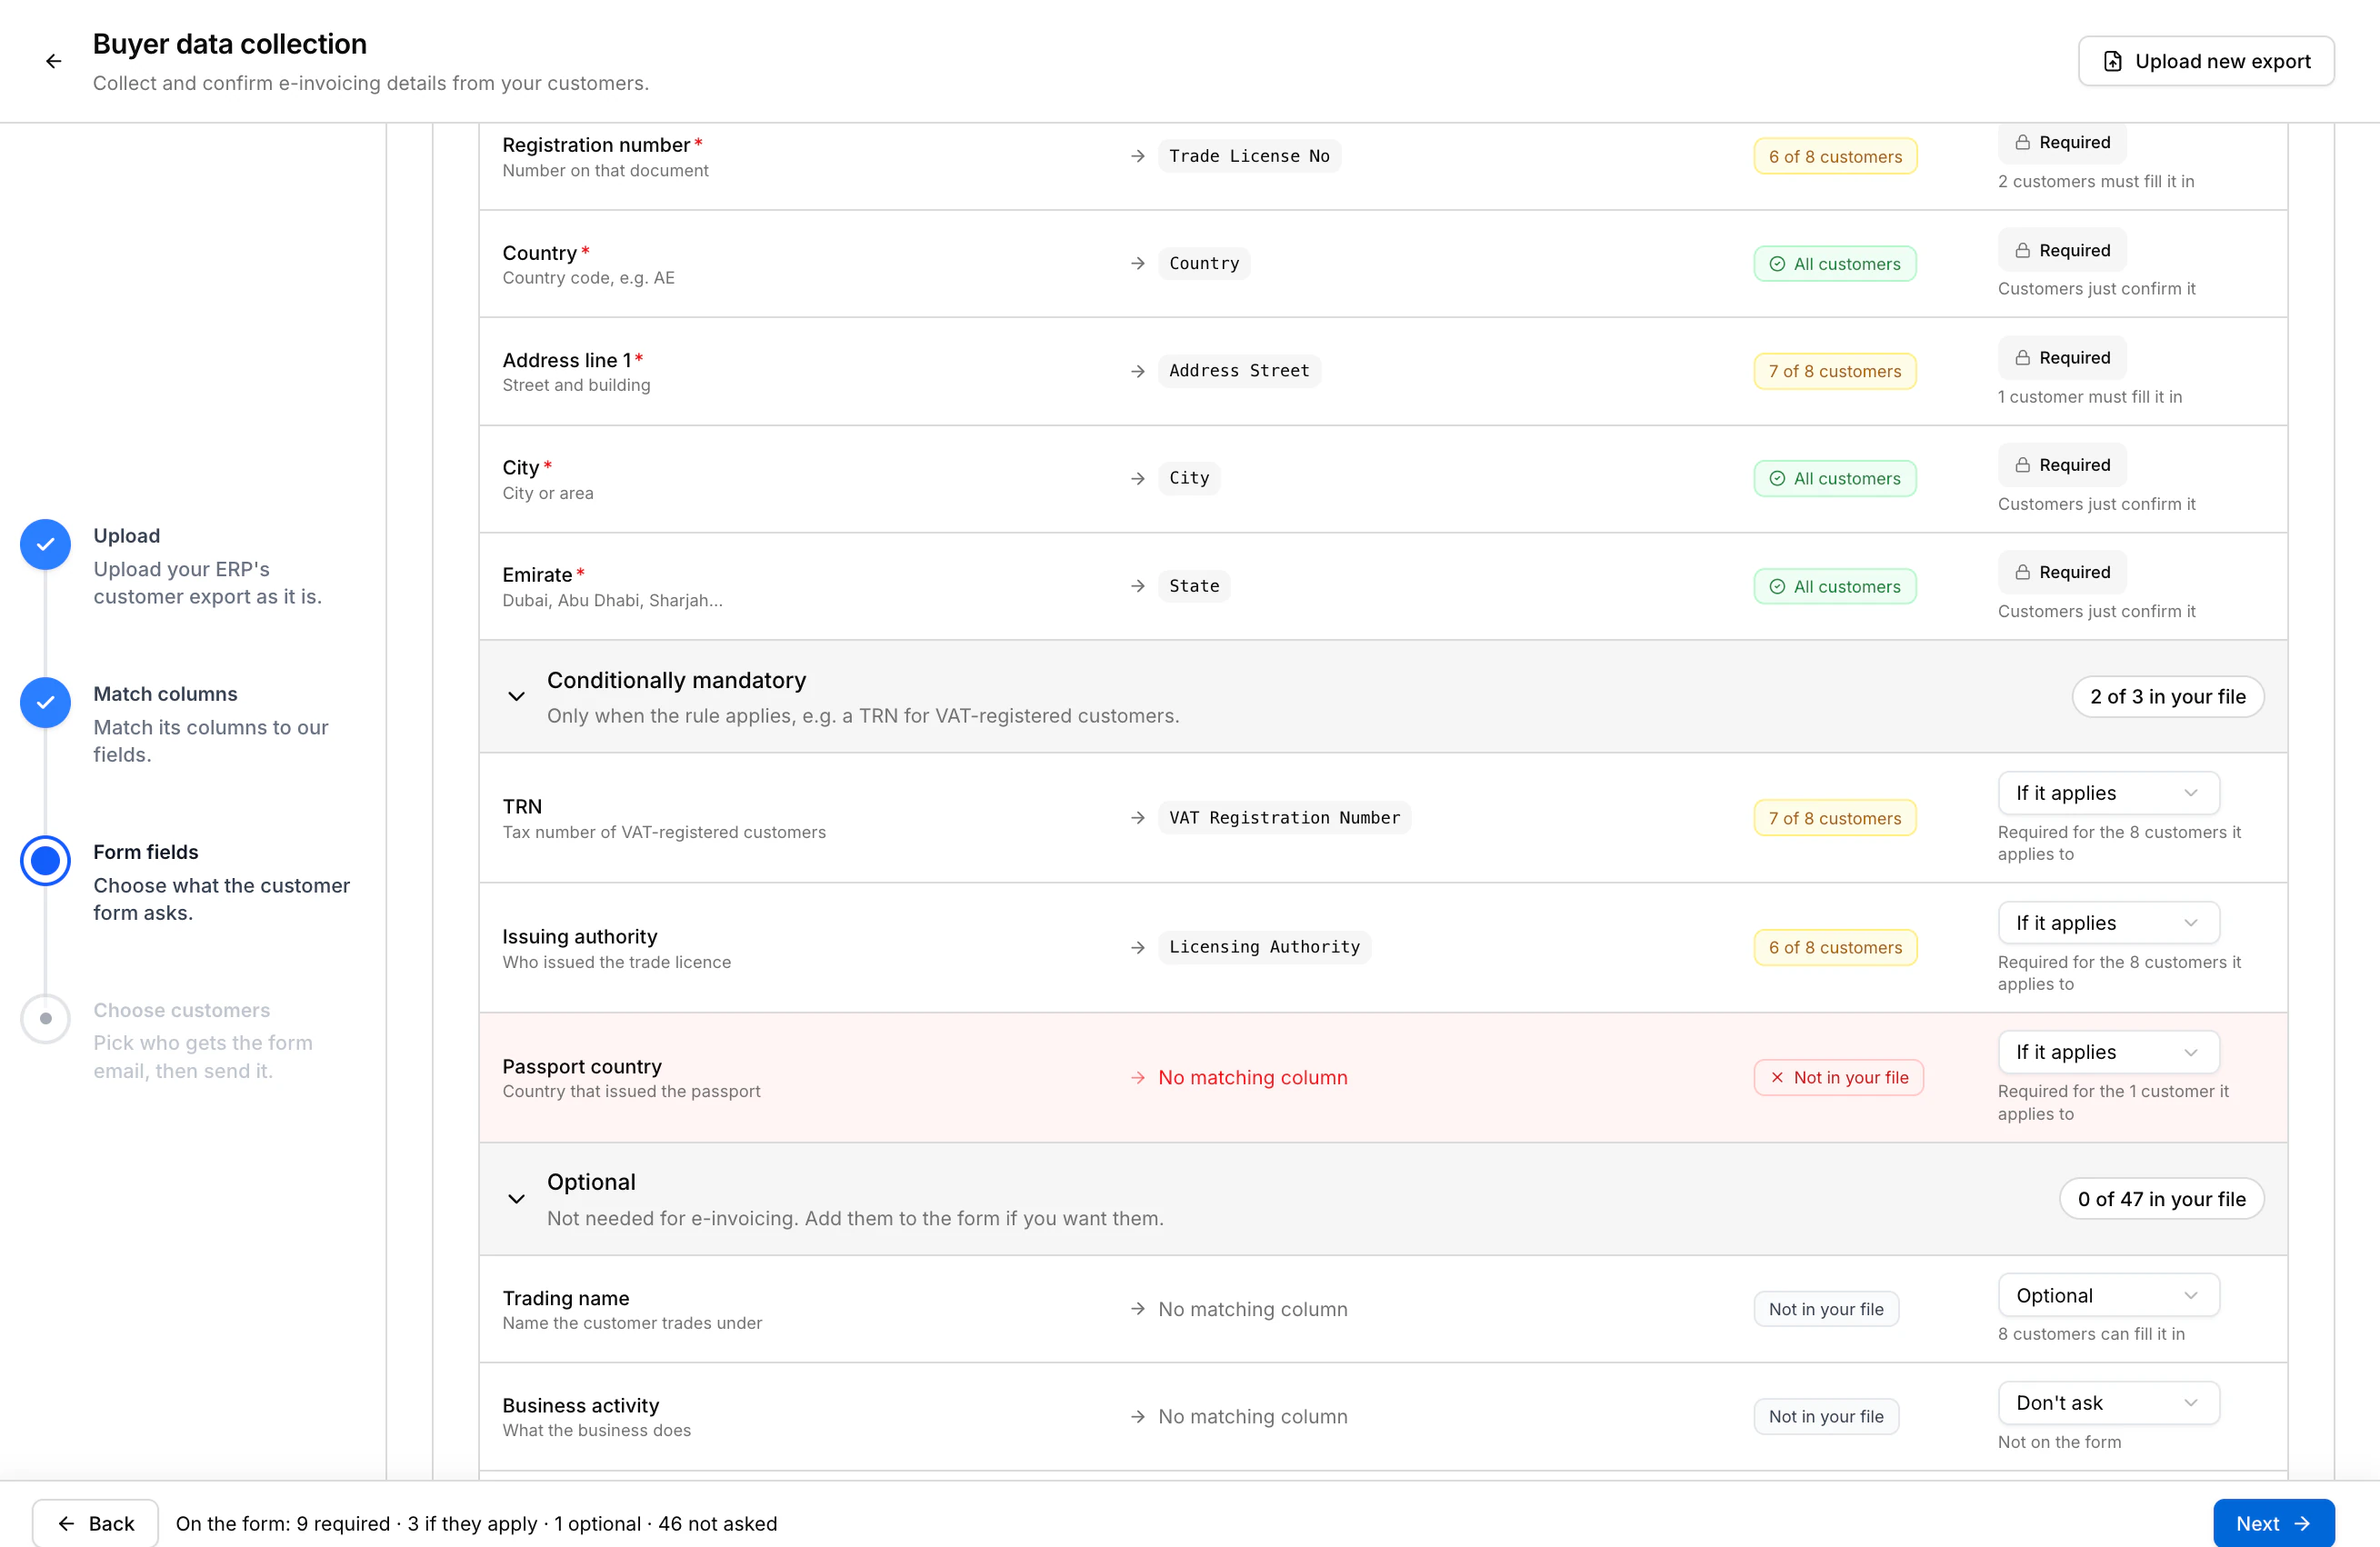
Form fields lists every field the customer form can ask, in three groups.
| Group | Fields | Settings |
|---|---|---|
| Mandatory | Legal name, Peppol ID, Peppol ID scheme, Registration type, Registration number, Country, Address line 1, City, Emirate | Always Required. Every UAE e-invoice needs these, so they cannot be turned off. |
| Conditionally mandatory | TRN, Issuing authority, Passport country | If it applies, Everyone or Don’t ask |
| Optional | 47 more fields, such as Trading name, Postal code and Contact person | Don’t ask, Optional or Required |
With If it applies, the form asks for the field only when its rule holds:
- TRN (the UAE tax registration number): VAT-registered customers and VAT-group members.
- Issuing authority: the registration type is a trade licence.
- Passport country: the registration type is a passport.
A Peppol ID and its scheme become optional for a customer whose annual revenue is below AED 50 million.
Under Custom fields, choose Add field to ask something that is not a buyer field, such as a cost centre or a copy of the trade licence. Enter the Question, choose an Answer type and say whether it is Required.
| Answer type | The customer enters |
|---|---|
| Text | Any text |
| Number | A number |
| Letters and numbers | Letters and digits only, with no spaces or symbols |
| Date | A date |
| Choice list | One of the choices you list |
| File upload | One PDF, JPG or PNG file, up to 10 MB |

Field settings and custom fields are locked once you send. Check them now, then choose Next. Back returns to column matching and keeps your form fields.
Choose who gets the form
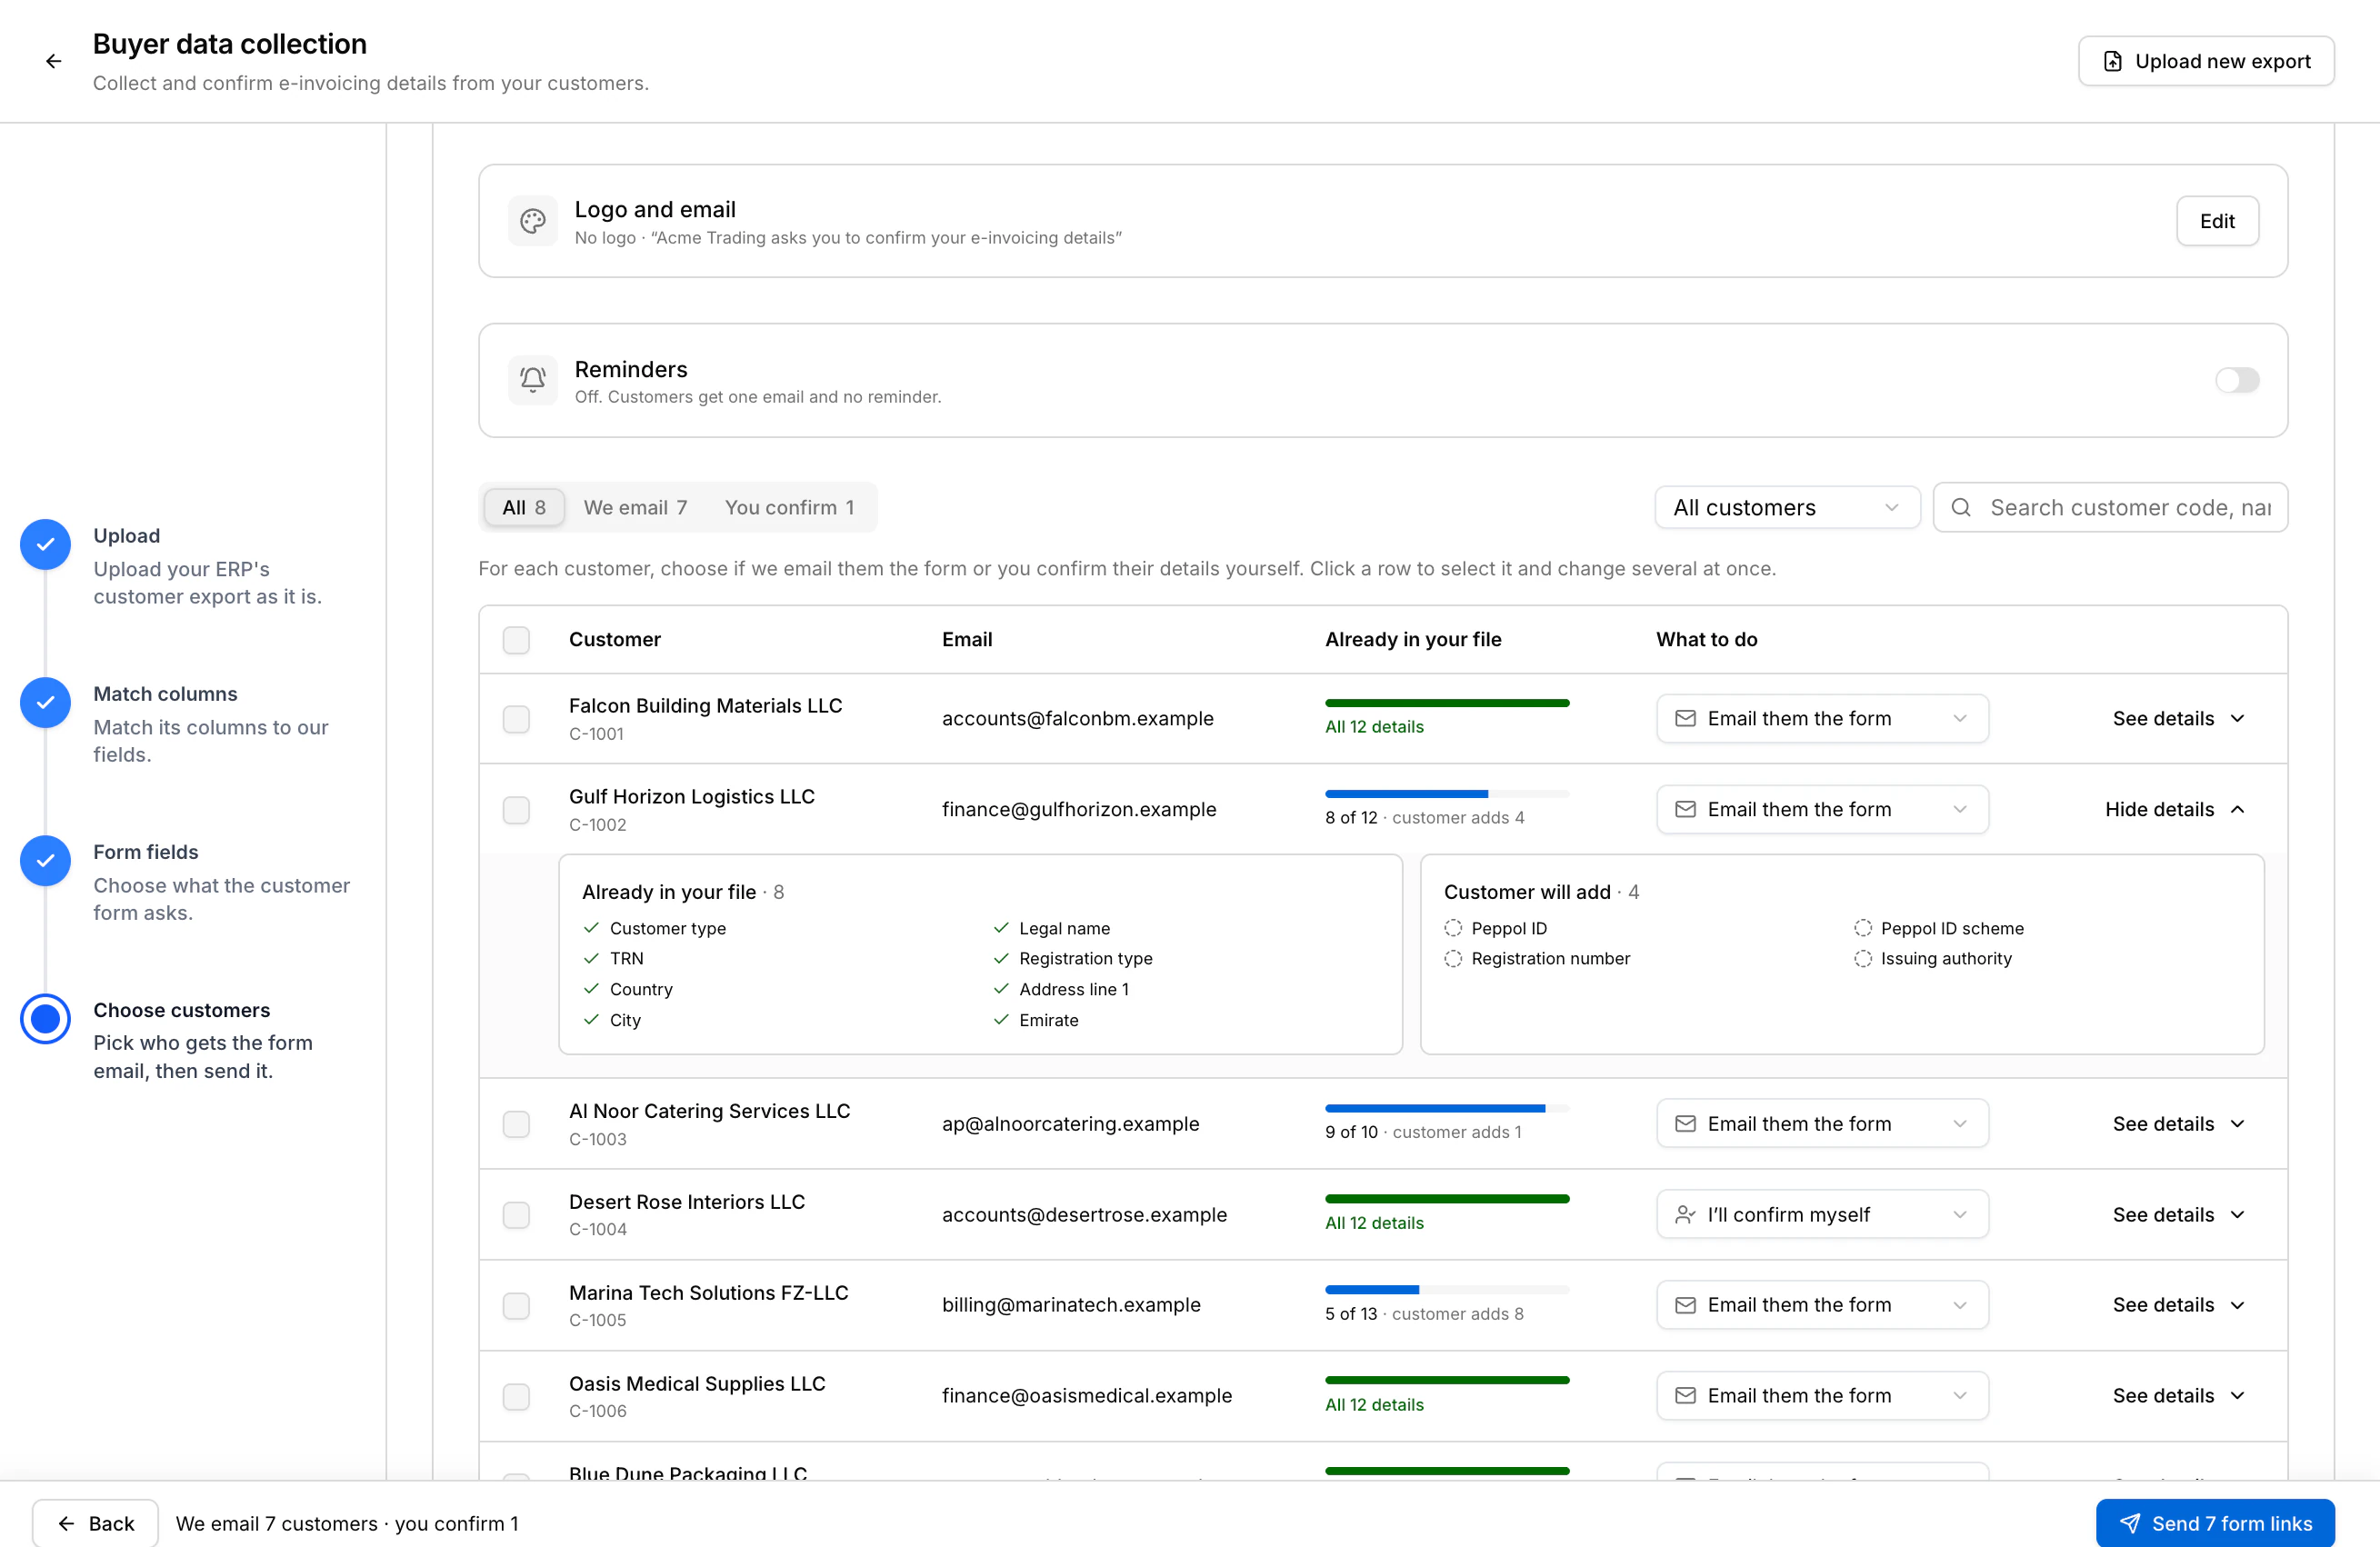
Who should we email? shows how many customers will be emailed, how many you will confirm yourself, and how many details your customers will add.
In the list, choose what to do for each customer:
- Email them the form: the customer checks their details and adds what is missing.
- I’ll confirm myself: no email is sent. You accept the details as they are in your file.
Already in your file shows how much of the form your file covers. Choose See details to list what is there and what the customer will add. If you confirm a customer whose details are incomplete, the missing ones stay empty.
To change several customers at once, select their rows and choose I’ll confirm them myself.
Three cards above the list set how the emails go out:
- Outlook: where emails are sent from. See Send from your Outlook mailbox.
- Logo and email: choose Edit to add your logo and change the Subject and Message. The dialog previews what your customer gets. The logo also appears on the form. Reset to standard restores the original wording.
- Reminders: turn on Send reminders to email customers who have not filled in the form. Set Remind every and Stop after. Reminders stop as soon as a customer submits.
Send the form links
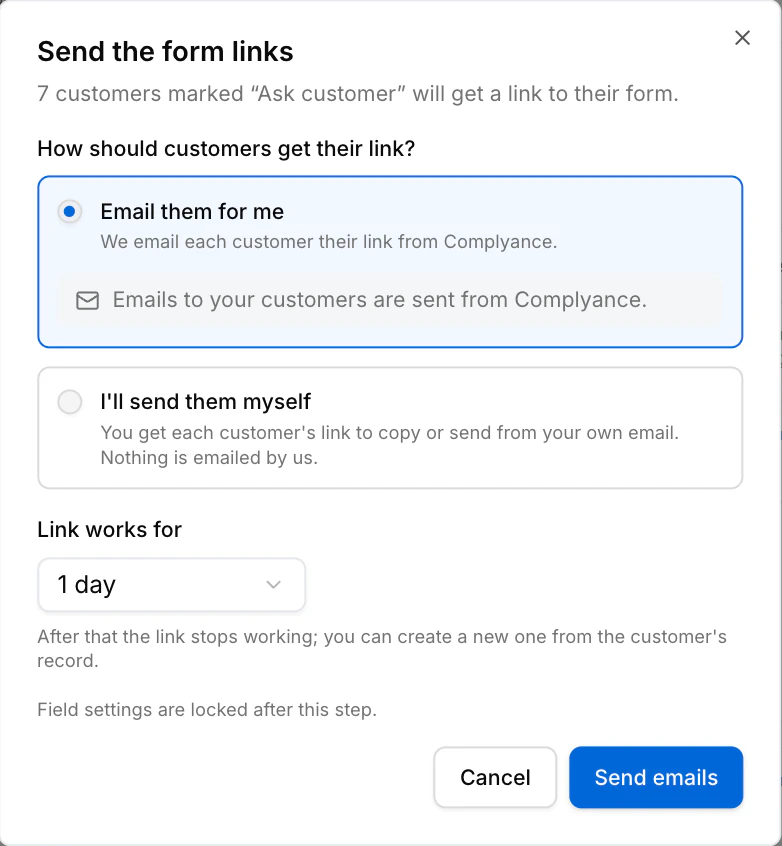
Choose Send form links. The button shows how many links it will send. In Send the form links, choose how customers get their link:
- Email them for me: Complyance emails each customer their link.
- I’ll send them myself: nothing is emailed. Each customer’s link appears in the list for you to copy or open in your own email. Download all links gives you an Excel file for a mail merge.
Under Link works for, choose 1, 3, 7, 14 or 30 days, or Custom… for any number of days from 1 to 30.
Choose Send emails or Create links. Customers you chose to confirm yourself are confirmed at the same moment.
Emails go out one after another. A customer shows Sending email until theirs is out.
Follow the replies
The collection now opens as a dashboard. Each tile is a list:
| Tile | Who is in it |
|---|---|
| Needs review | Customers who replaced a key detail from your file. They wait for your decision. |
| Changed by customer | Confirmed customers whose answers differ from your file. There is nothing to decide. |
| Confirmed, no changes | Confirmed with nothing changed, by the customer or by you. |
| Waiting on customer | Link sent or created, no reply yet. |
| No email | Customers with no valid contact email. An upload skips rows without one, so this is normally 0. |
| Email not delivered | The email bounced or could not be sent. |
| All customers | Everyone in this collection. |
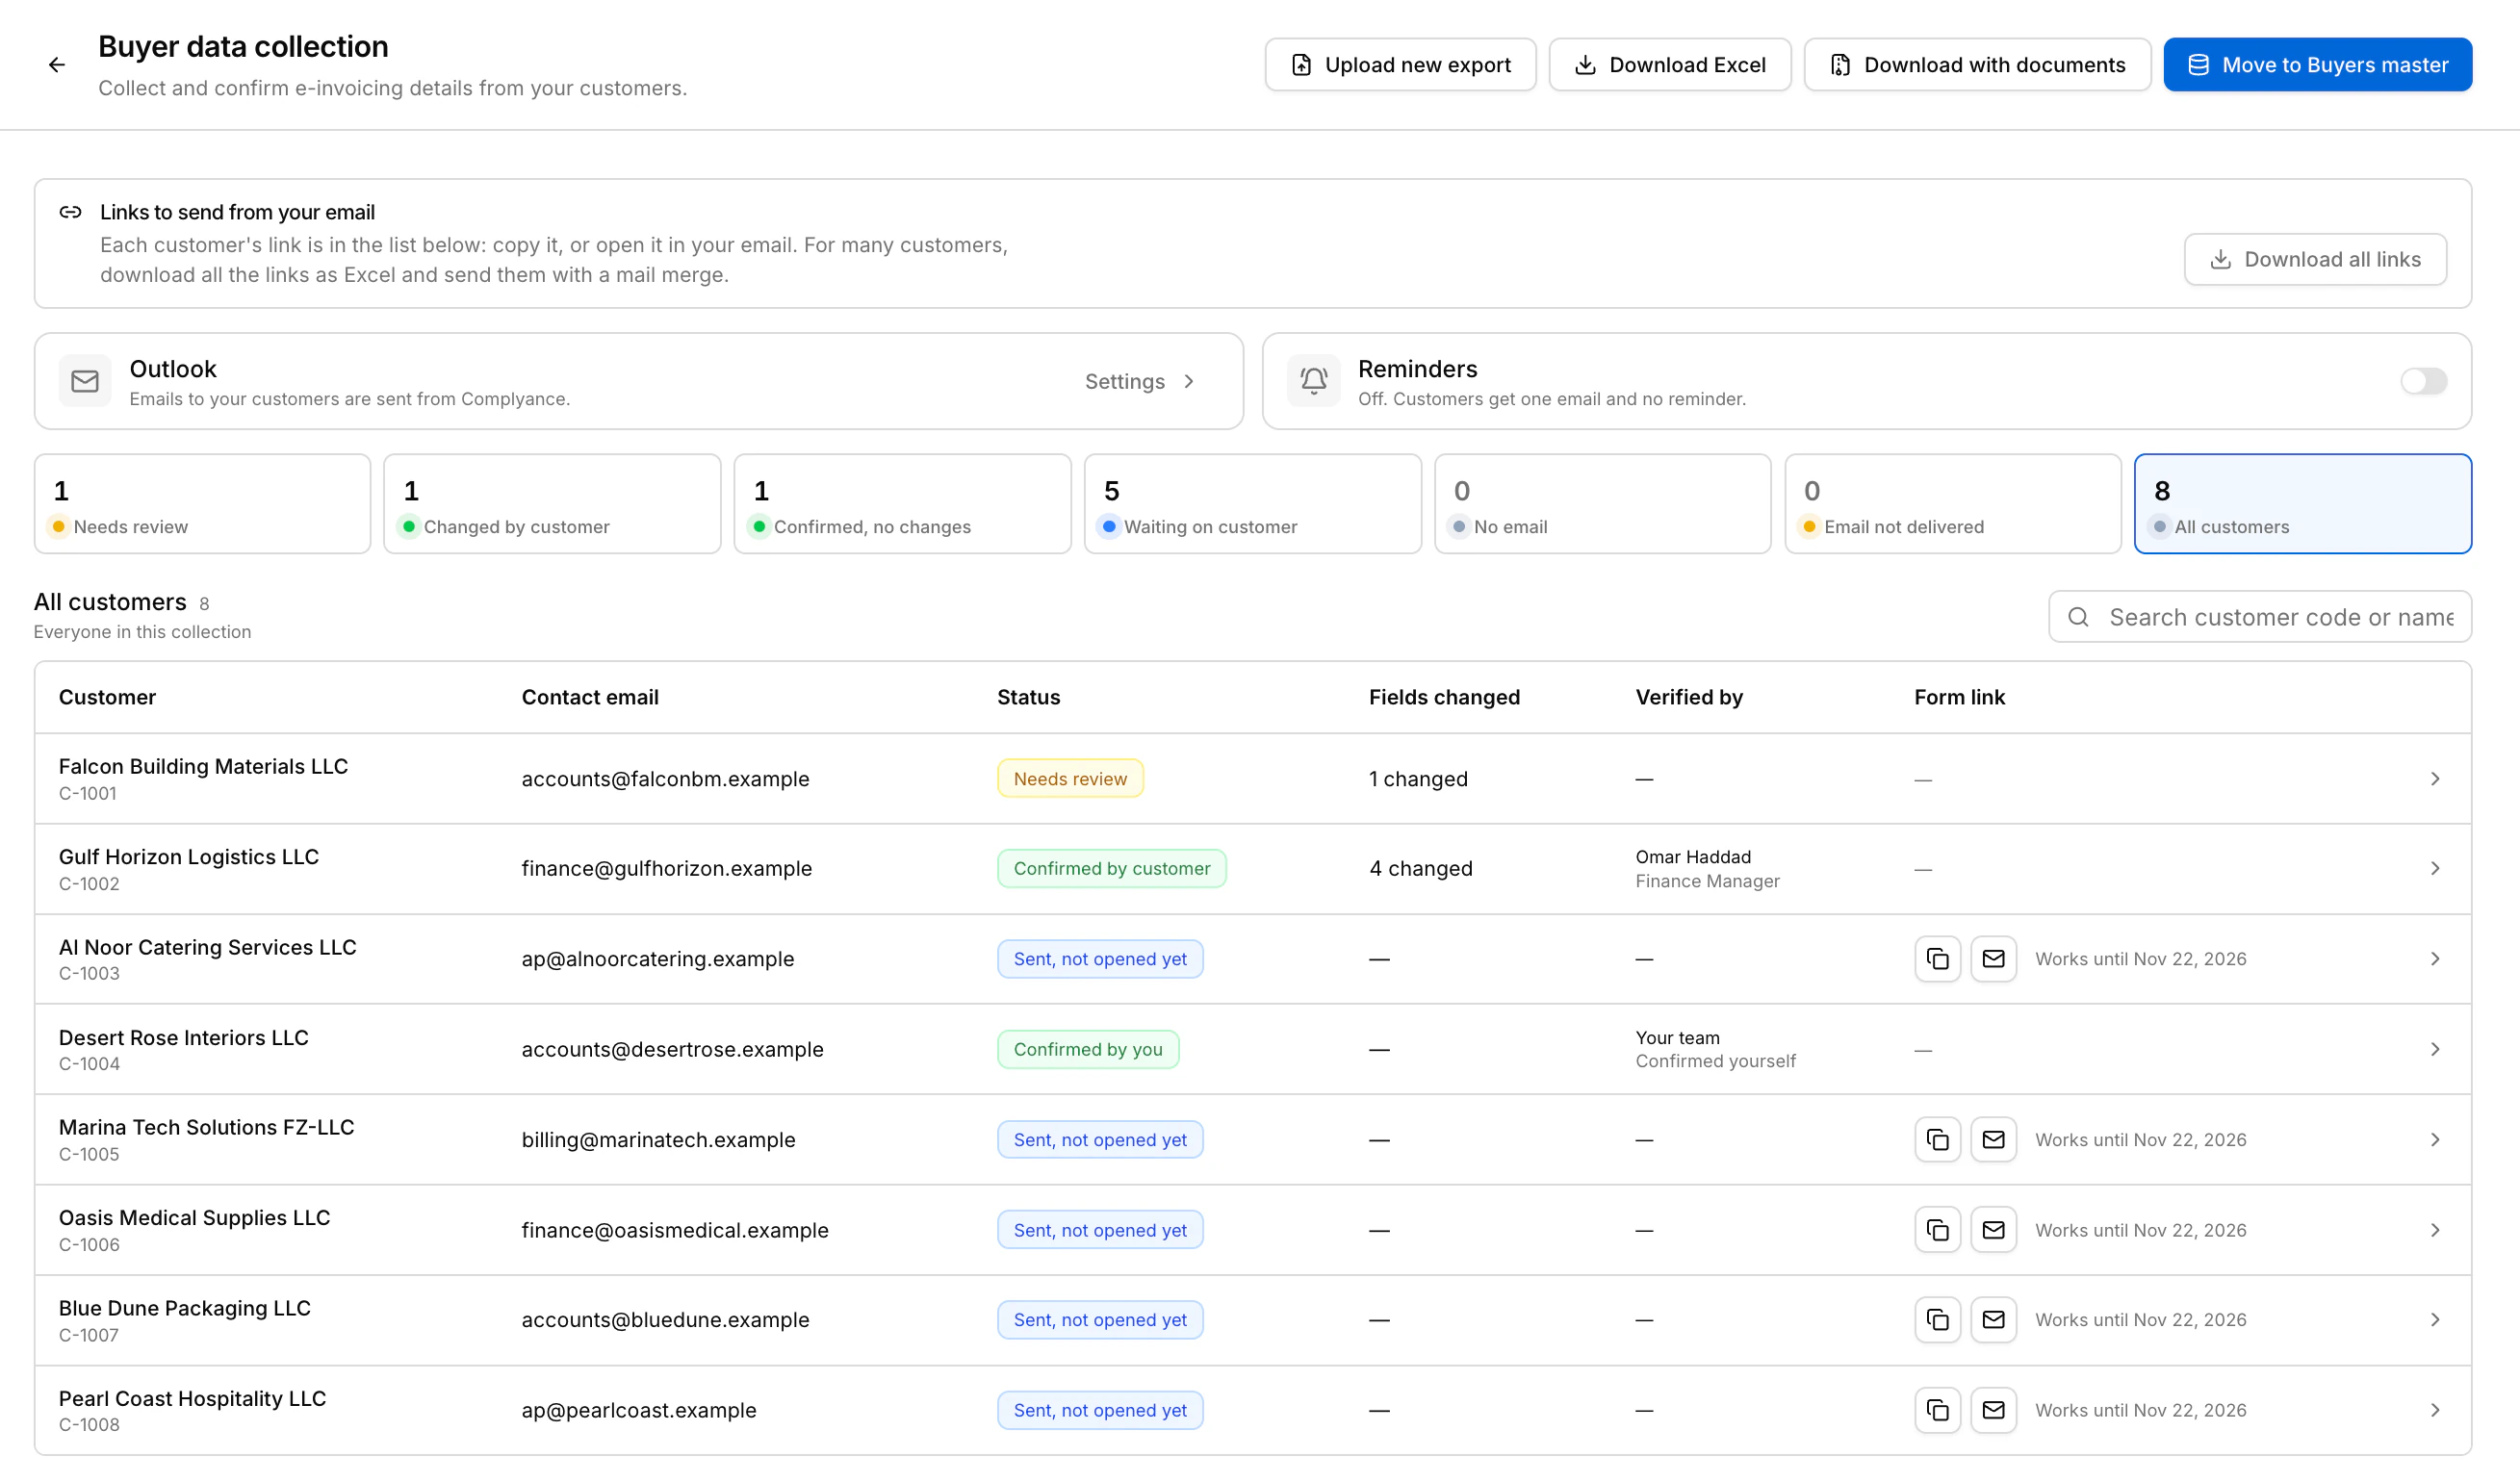
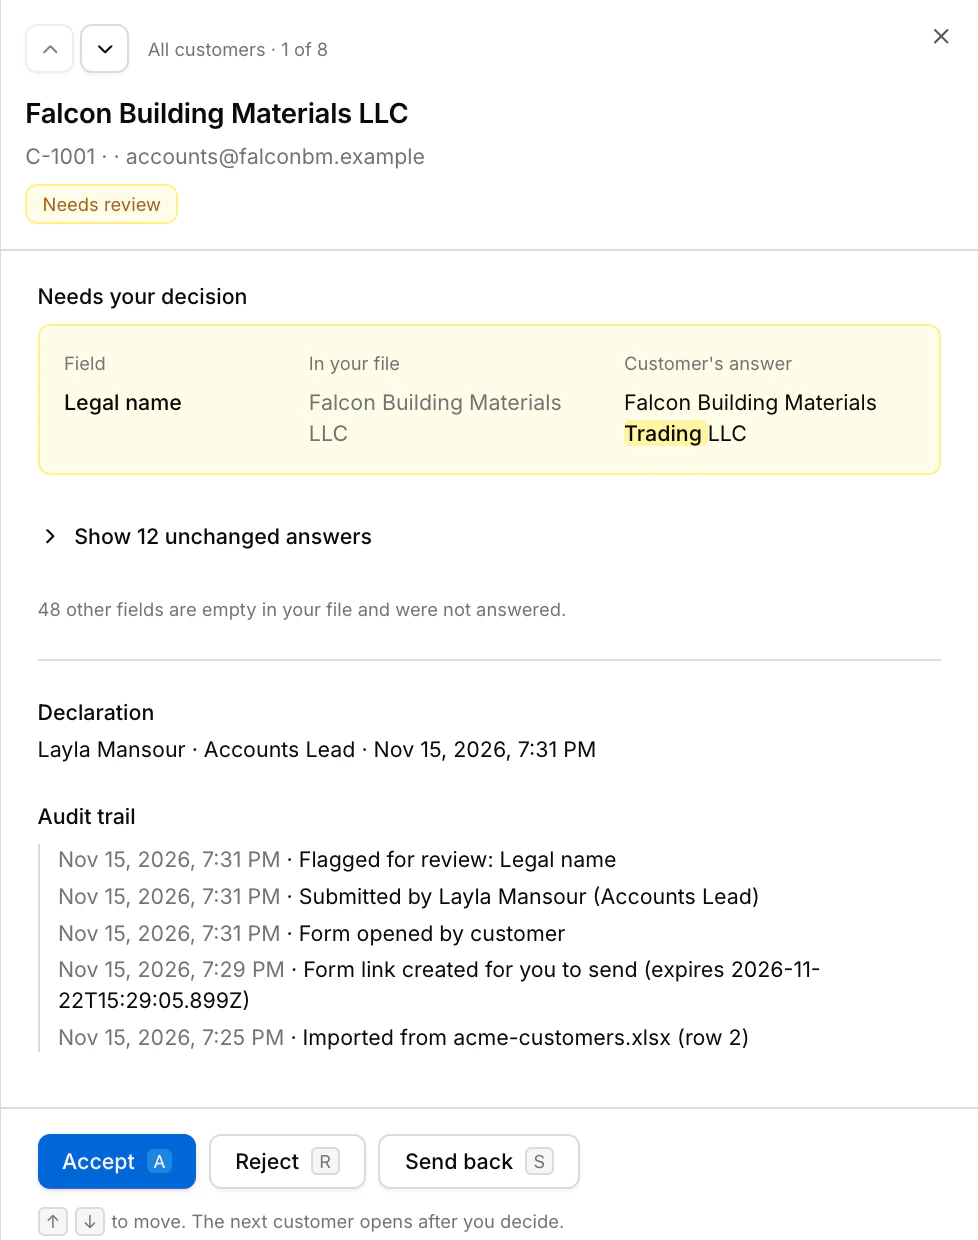
Choose a customer to open their record. It shows their answers, the declaration, an Audit trail of everything that happened, and any documents they uploaded. For a customer who has not replied, Email a new link or Get a link to send myself creates a new link. A new link replaces the previous one.
To come back to a collection later, open Buyer data collection and choose it under Previous uploads.
Review the answers that need a decision
Most answers need no review. A customer who fills a gap in your file, or changes a field that is not a key field, is confirmed automatically.
A customer goes to Needs review when they replace a value that was valid in your file for one of these: Legal name, TRN, Country, Customer type or Annual revenue. The list shows the value in your file next to the customer’s answer, with the difference highlighted.
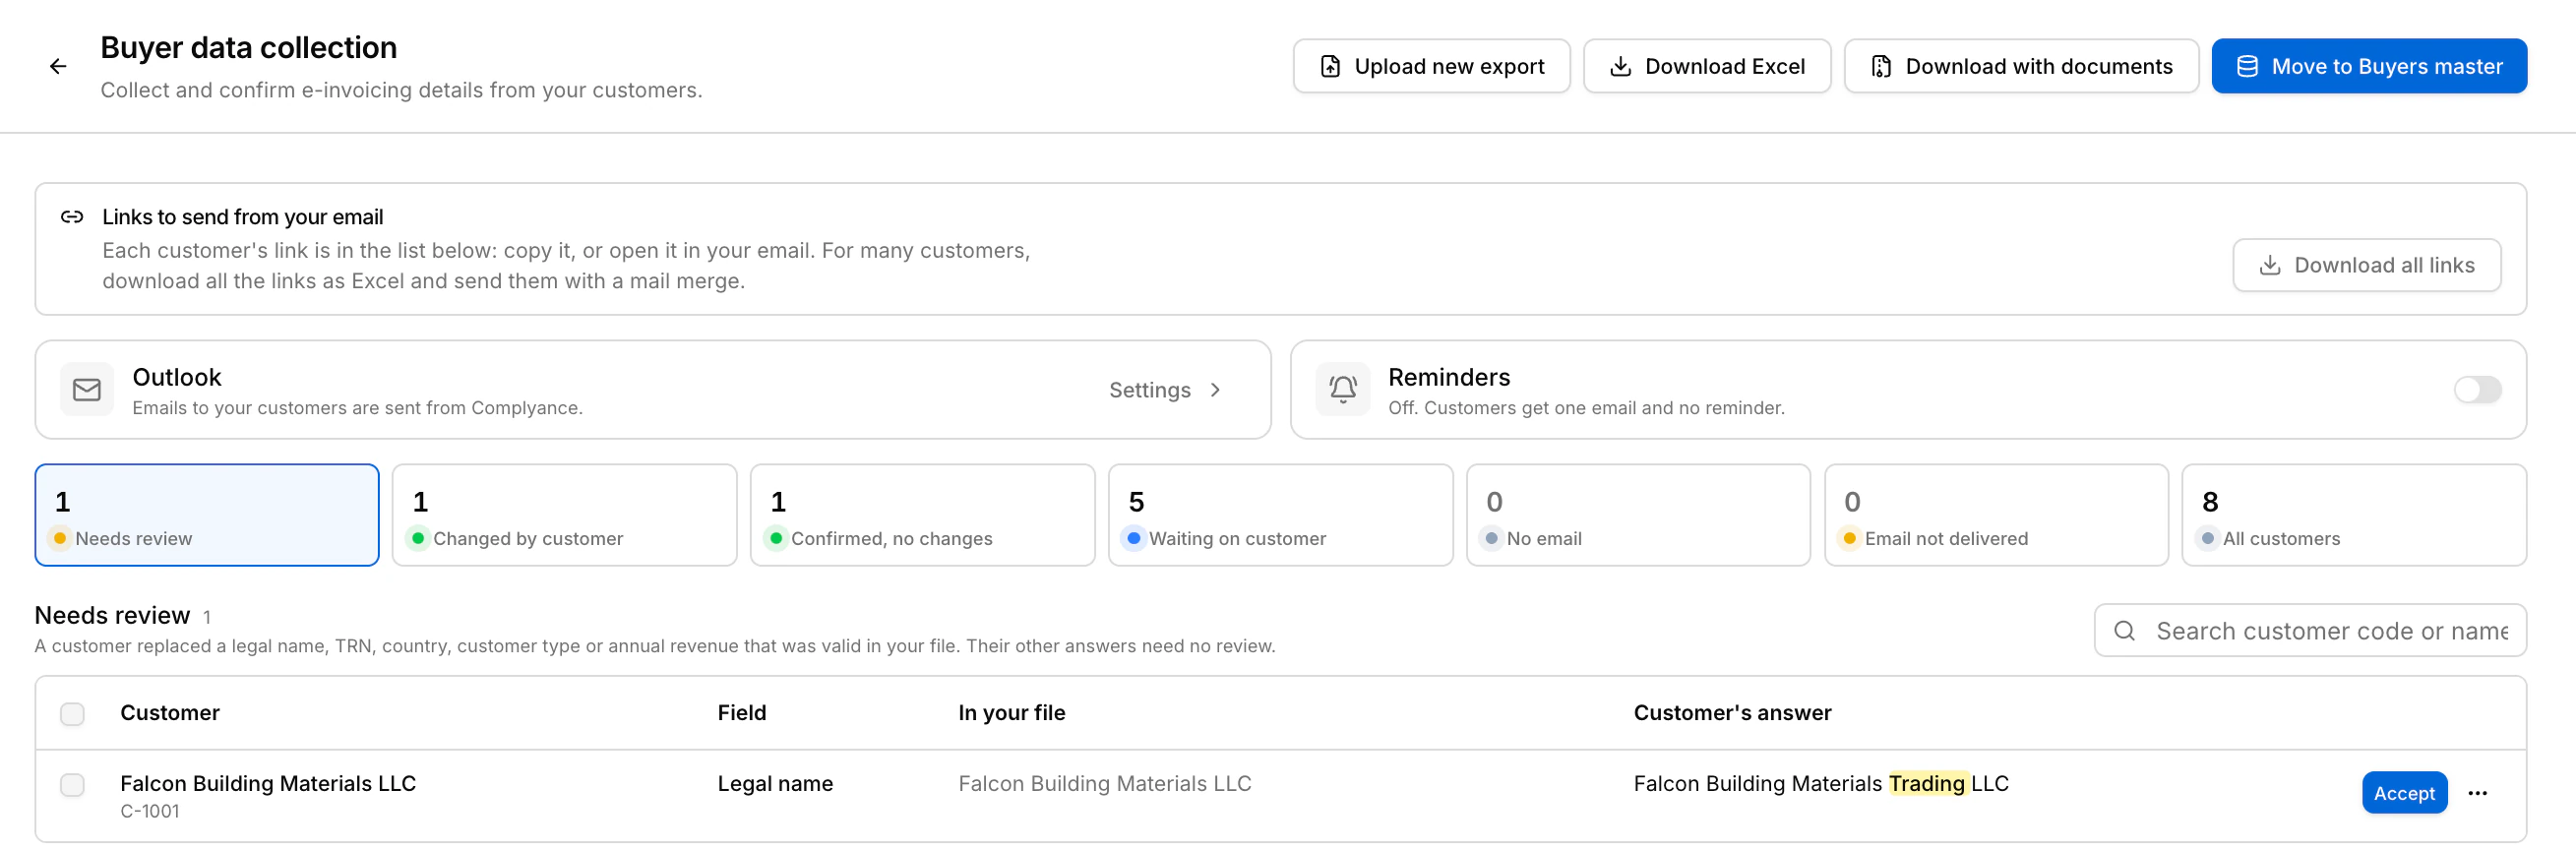
Decide for each customer:
| Decision | What happens |
|---|---|
| Accept | The customer’s answers replace the values from your file. You are recorded as the verifier. |
| Reject | The value from your file is kept. The customer shows Rejected · upload kept and is not moved to the Buyers master. |
| Send back | The customer gets a new form link and answers again. |
Open a customer to decide from their record. Press A, R or S, and use the arrow keys to move between customers. The next customer opens after you decide.
To decide for several customers at once, select them in the list. Under What changed, choose a field to narrow the list first. One decision can cover up to 1,000 customers.
Move confirmed customers to the Buyers master
Choose Move to Buyers master. The dialog lists who moves now and who stays in the collection. Check the counts, then choose the Move button, which shows the number of customers.
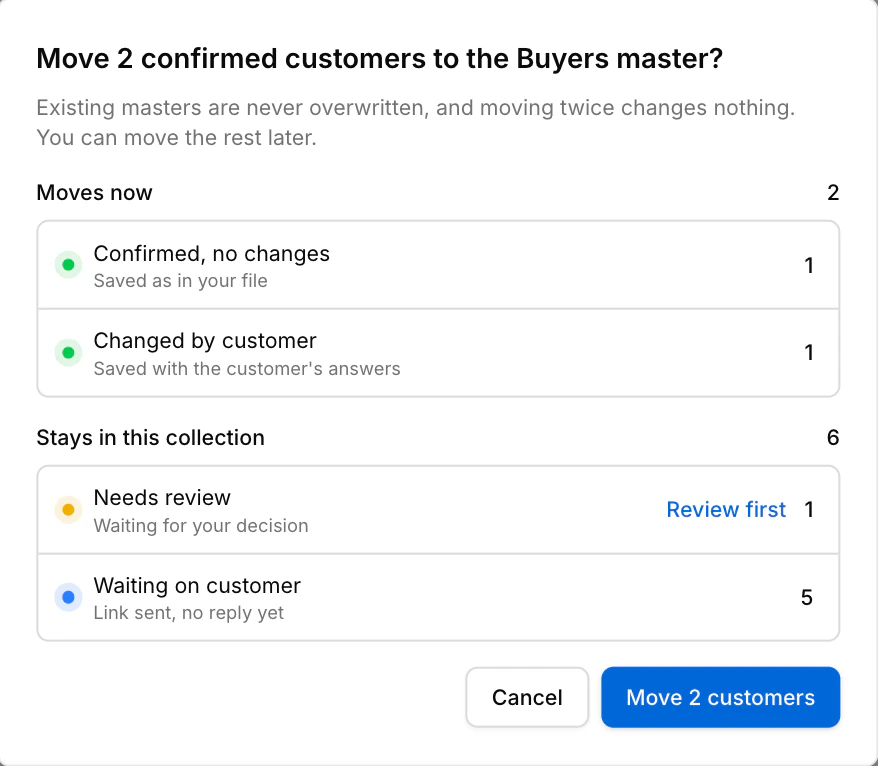
Each moved customer becomes a buyer record in Masters, for the country and environment you are working in. The customer code becomes the buyer’s ID. A customer confirmed with no changes is saved as in your file. One who changed their details is saved with their answers.
Know these limits before you move:
- Moving never changes a buyer that is already in the Buyers master, and moving twice changes nothing.
- Moving does not look for an existing buyer with the same ID. If you already added that buyer by hand, you get a second record. Check the Buyers catalog for duplicates afterwards.
- These answers are not saved to the Buyers master: Customer type, Annual revenue, Peppol ID scheme, Issuing authority, Passport country, custom field answers and uploaded documents. They stay in the collection and its export.
To keep everything, choose Download Excel. If the form had a File upload question, Download with documents prepares a ZIP with the Excel file and every uploaded document. Large collections can take several minutes, and you can leave the page while it is prepared. The ZIP stays available for 24 hours.
What your customer sees
The link opens a form that needs no sign-in. It shows your workspace name as the requester, the customer’s name, their customer code and when the link expires. If you added a logo, it replaces the Complyance logo at the top.
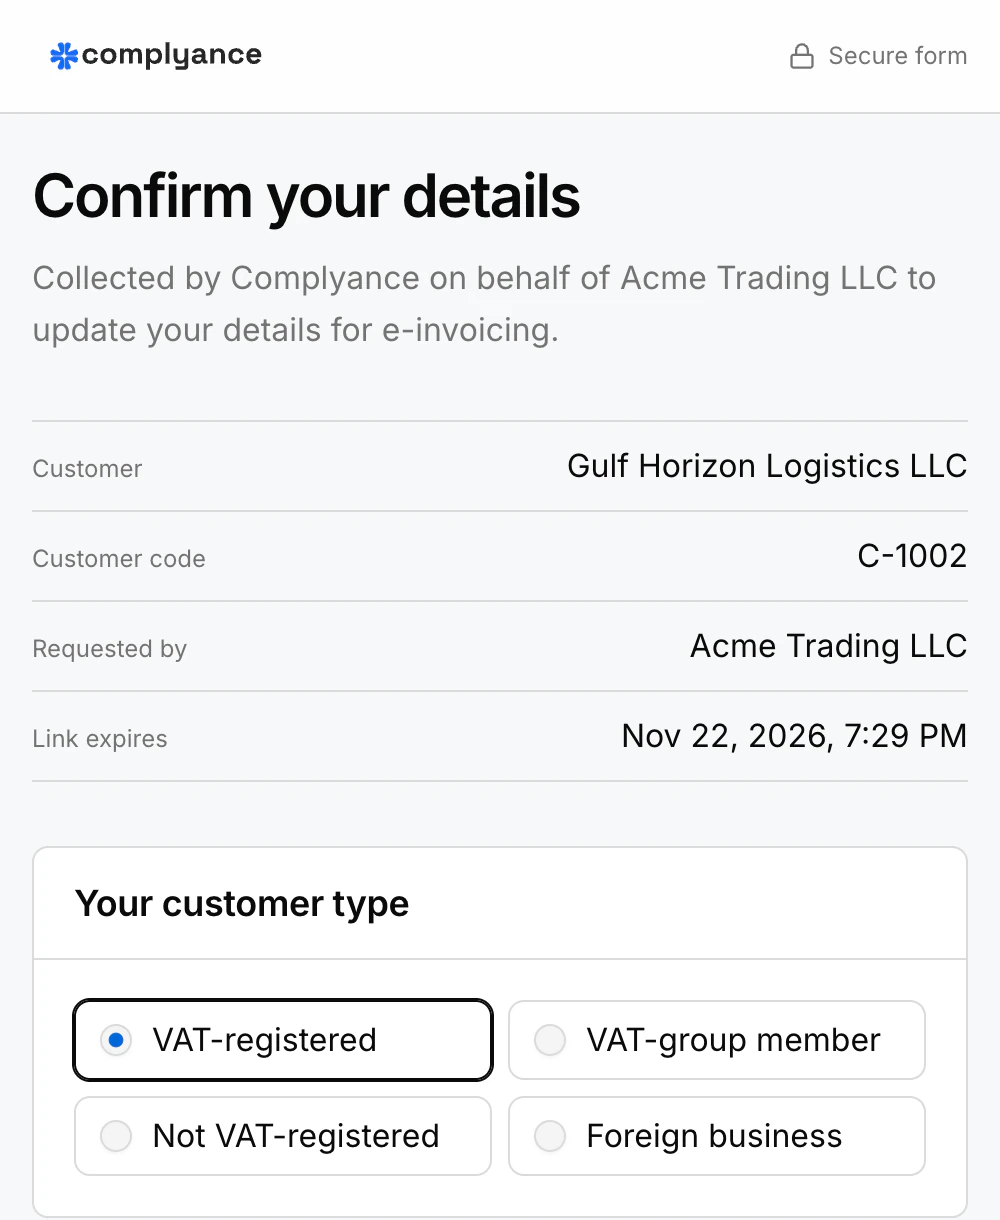
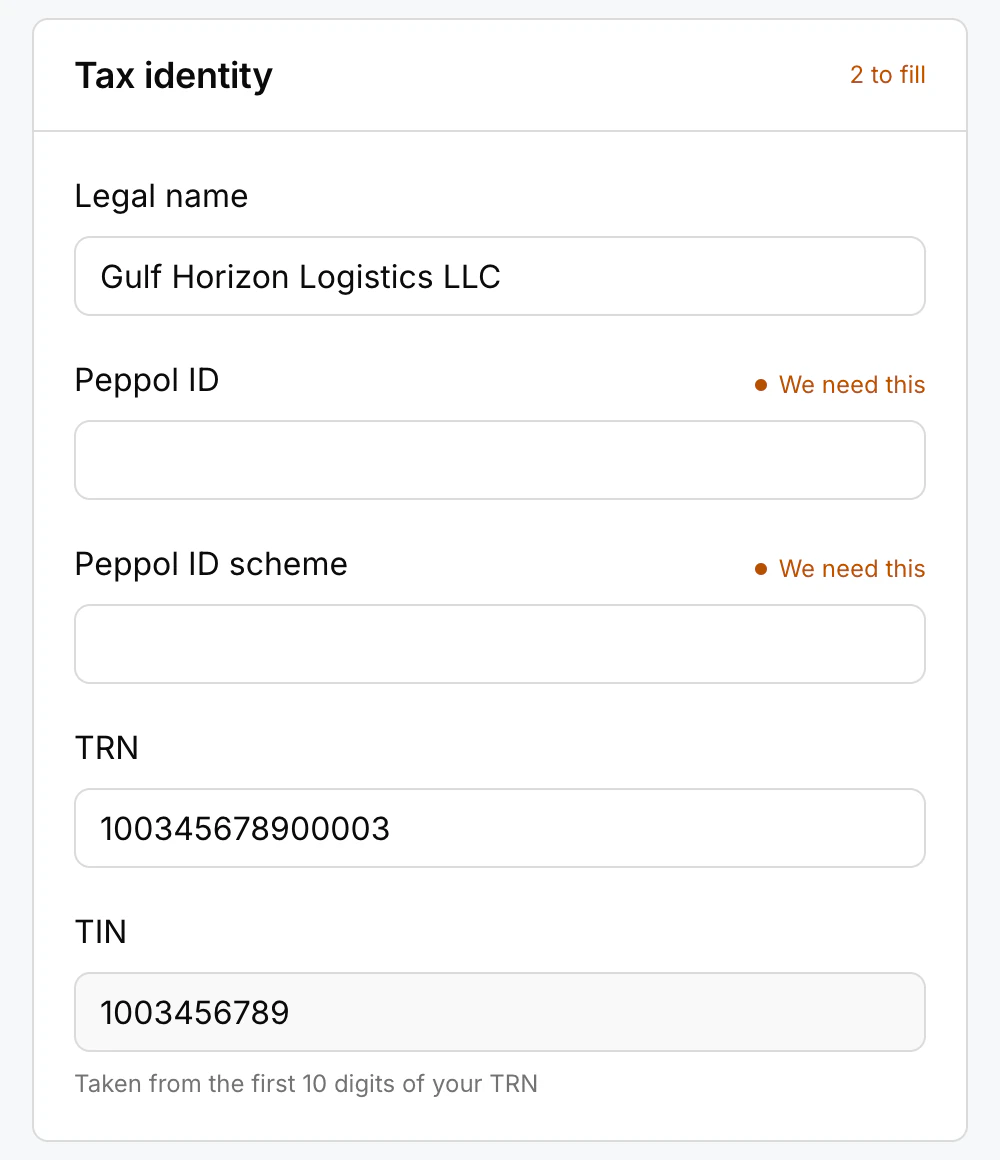
The customer chooses their customer type and annual revenue, then works through the sections: Tax identity, Legal registration, Business, Address, Contact person and Additional information, which holds your custom fields. Values from your file are filled in. A field you need and do not have is marked We need this.
To finish, the customer enters their full name and job title, confirms that the details are accurate and that they are authorised to provide them, and chooses Submit.
A customer can submit once. After that, the link stops working. To let them change an answer, send the customer back or create a new link from their record.
Customer statuses
| Status | Meaning |
|---|---|
Sending email | The form email is waiting to be sent. |
Sent, not opened yet | The link was emailed or created. The customer has not opened it. |
Opened | The customer opened the form and has not submitted it. |
Confirmed by customer | The customer submitted and nothing needs your review. |
Confirmed by you | You chose I’ll confirm myself. The details from your file are accepted as they are. |
Needs review | The customer replaced a key detail. Decide whether to accept it. |
Rejected · upload kept | You rejected the customer’s change. The value from your file is kept. |
Email bounced | The email was sent and came back as undeliverable. |
Email not sent | The email could not be sent. Choose Send form links again to retry. |
No email | There is no valid contact email, so no link was created. |
Send from your Outlook mailbox
By default, form emails and reminders come from Complyance. To send them from your company’s mailbox, choose Settings on the Outlook card, then Connect Outlook, and sign in with Microsoft.
- Emails are sent from the connected mailbox at about 30 a minute.
- An email that bounces is shown on the customer as
Email bounced. - When you send, you can still choose Email them from Complyance for one collection.
- If the card says
Emails are not being sent. Connect Outlook again in Settings., choose Reconnect. Reminders also wait until you do.
Choose Disconnect to go back to sending from Complyance.
Limits
| What | Limit |
|---|---|
| Country | United Arab Emirates only |
| File type and size | .xlsx or .csv, up to 25 MB |
| Customers in one file | 50,000 rows |
| Header row | Within the first 10 rows |
| Duplicates | Each Entity and customer code pair once per file |
| Uploads | Each upload is its own collection. Uploads are not merged, so a customer in two uploads is asked twice. |
| Custom fields | 10 per collection. A question can have up to 100 characters. |
| Choice list | Up to 30 choices of up to 100 characters each. The customer picks one. |
| Customer file upload | One PDF, JPG or PNG per question, up to 10 MB |
| Logo | PNG or JPG, up to 500 KB |
| Email wording | Subject up to 150 characters, message up to 2,000 characters |
| Link length | 1 to 30 days. The default is 1 day. |
| Reminders | Every 1 to 30 days, up to 10 reminders per customer. Off until you turn them on. Not sent when you send the links yourself. |
| Form submissions | One per link |
| Changes after sending | Field settings and custom fields cannot be changed |
| Decisions at once | Up to 1,000 customers |
| ZIP with documents | Available for 24 hours |
If something goes wrong
Buyer data collection is available for the UAE only.
Select United Arab Emirates in the country switcher, then open the page again.
You are not authorized to view buyer data collection.
Your role cannot create master records. You need the Owner, Admin or User role. See roles.
Upload an .xlsx or .csv file.
Older .xls files are not accepted. Save the file as .xlsx or CSV and upload it again.
The file has more than 50000 customer rows
Split the export into smaller files and upload each one. Each becomes its own collection.
No sheet with a header row and customer rows was found
Make sure the column names are in the first 10 rows and that at least one customer row follows them.
Rows were not imported
The Choose customers step shows how many rows were skipped, and the reason for the first 20.
| Reason | What to do |
|---|---|
Customer code is missing | Add the customer’s code to the row. |
Duplicate Entity + Customer code | The message names the row where the pair first appears. Remove or correct one of the two. |
Contact email is missing | Add an email address for the customer. |
Contact email is not a valid email address | Correct the address. |
Fix the rows in your export. While the collection is not sent, choose Back until you are on Upload, choose the corrected file and import it again. It replaces the customers in the same collection. After sending, upload the missing customers as a new collection.
The upload was blocked
If the message says the file was blocked by upload checks, contact support and share the reference shown in the message.
An email was not delivered
Open the customer from Email not delivered to see why. Then choose Email a new link to try again, or Get a link to send myself and send it another way. If the address in your file is wrong, send the link to the right address yourself, or correct it in your ERP and upload the customer again.
A customer says the link does not work
This link is no longer available: the link expired or the form was already submitted.This link is not valid: part of the link is missing, or a newer link replaced it. Each reminder carries a new link.
Open the customer’s record and create a new link.
Next, create or fix a document with the buyers you moved.
Last updated