

Manage your account, team and roles
Update your profile, secure your sign-in, invite teammates with the right role and choose who gets email notifications. What you can change depends on your role in the workspace.
Open Settings
In the Invoice Portal sidebar, choose Settings. A menu opens with the pages your role can use.

| Menu item | What it does | Who sees it |
|---|---|---|
| Account Settings | Your profile, language, view zoom and Test Mode | Everyone |
| Security | Active sessions, two-factor authentication, password reset and sign-out | Owner, Admin |
| Subscription | Your workspace plan | Owner, Admin |
| User Access Management | Teammates, invitations and roles | Owner, Admin, User |
| Notification settings | Which email notifications your workspace sends | Owner, Admin |
Security and Subscription are hidden while Test Mode is on.
Update your profile
Open Account Settings
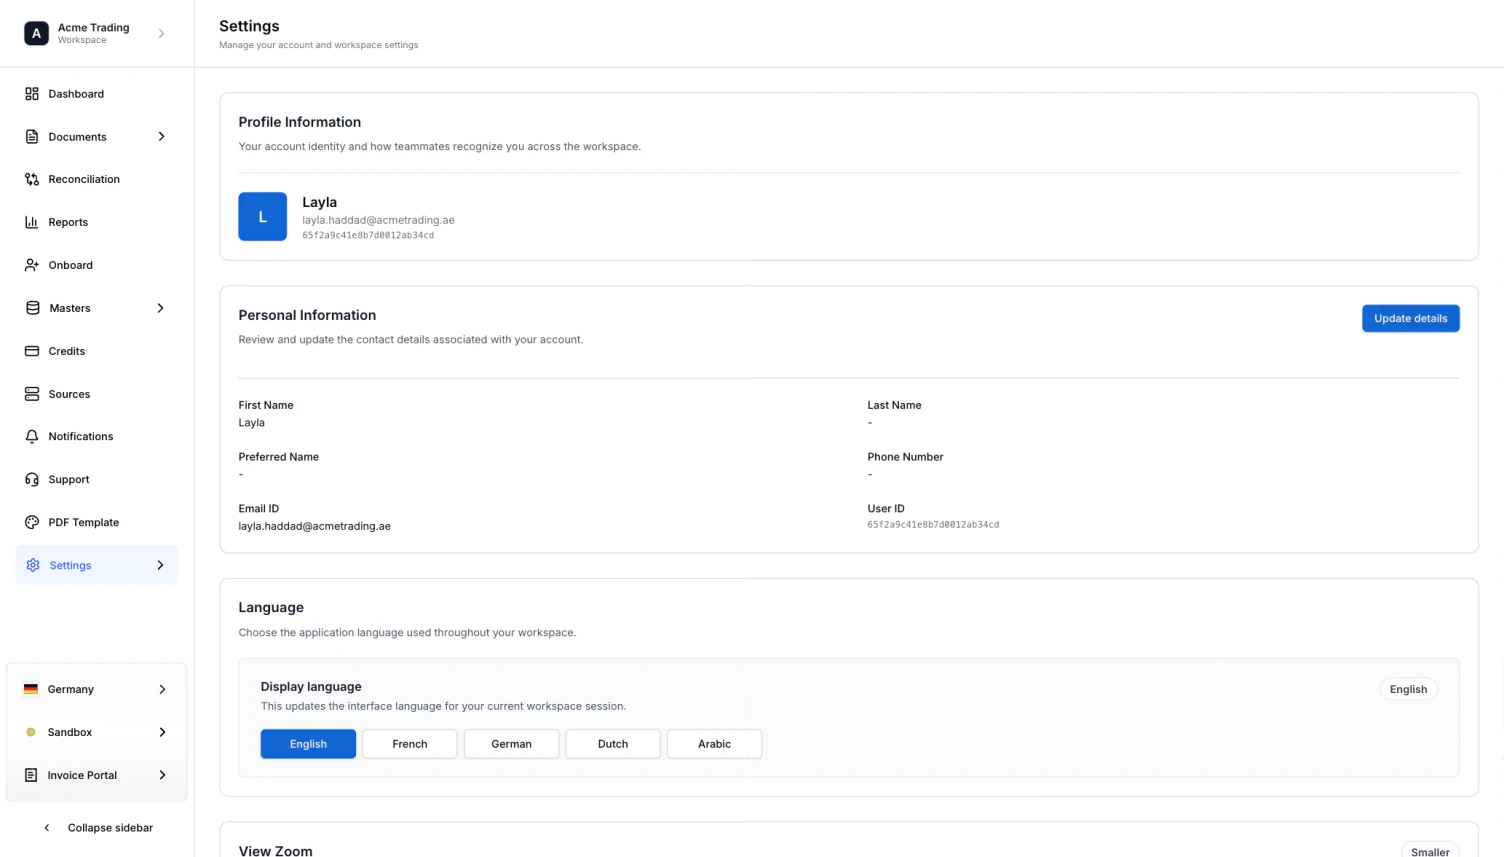
Choose Settings, then Account Settings. Profile Information shows your name, email and user ID.
Edit your details
Under Personal Information, choose Update details. You can change First Name, Last Name, Preferred Name, Phone Number and Email ID. User ID cannot be changed.
First Name and Email ID are required.
Save
Choose Save. You should see Profile updated successfully.
To stop without saving, choose Cancel. If you have made changes, you are asked to confirm that you want to discard them.
Change language and view zoom
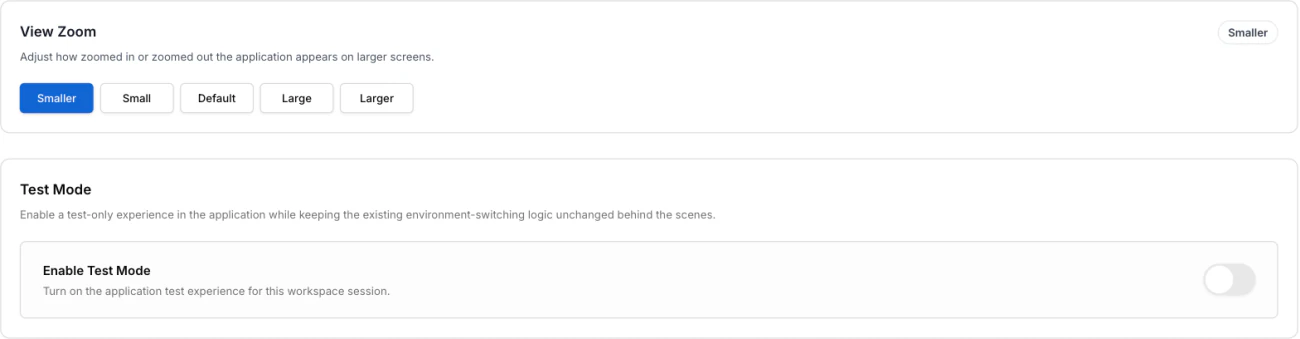
Both settings apply as soon as you choose them. There is nothing to save.
- Language: choose English, French, German, Dutch or Arabic. The page reloads in the new language. Arabic switches the layout to right-to-left.
- View Zoom: choose Smaller, Small, Default, Large or Larger to scale the whole application. This helps on large or small screens.
Turn on Test Mode
Under Test Mode, switch on Enable Test Mode to use the application’s test experience. Switch it off to return to the environment you were using before.
While Test Mode is on, Security and Subscription do not appear in the Settings menu.
Secure your account
Security is available to Owners and Admins.
Review active sessions
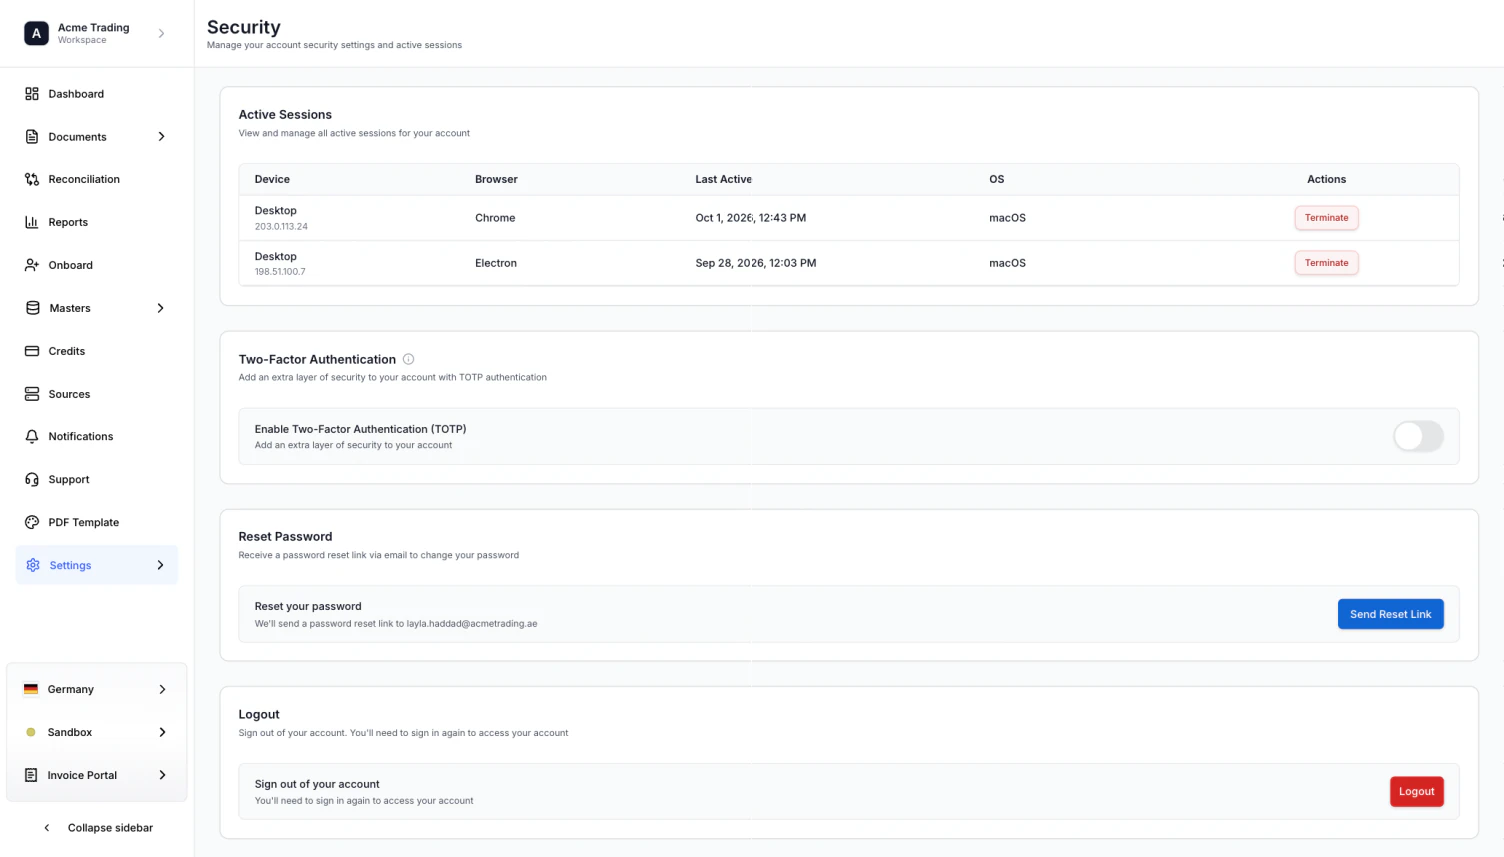
Active Sessions lists every device signed in to your account, with its browser, operating system and when it was last active.
To sign a device out, choose Terminate on its row and confirm. If you terminate your current session, you are signed out immediately.
Turn on two-factor authentication
By default, we send a one-time code to your email when you sign in. You can use an authenticator app instead, such as Google Authenticator or Microsoft Authenticator.
- Under Two-Factor Authentication, switch on Enable Two-Factor Authentication (TOTP).
- Scan the QR code with your authenticator app. If you cannot scan it, copy the secret key and add it to the app by hand.
- Enter the 6-digit code the app shows, then choose Enable.
To turn the authenticator off, switch it off and confirm. Your authenticator details are deleted, and email codes are used again.
Reset your password
Under Reset Password, choose Send Reset Link. We email a link to the address on your profile. Open it to set a new password.
Sign out
Under Logout, choose Logout and confirm. This signs out the current session only. To sign out other devices, terminate them under Active Sessions.
Invite teammates
Open User Access Management
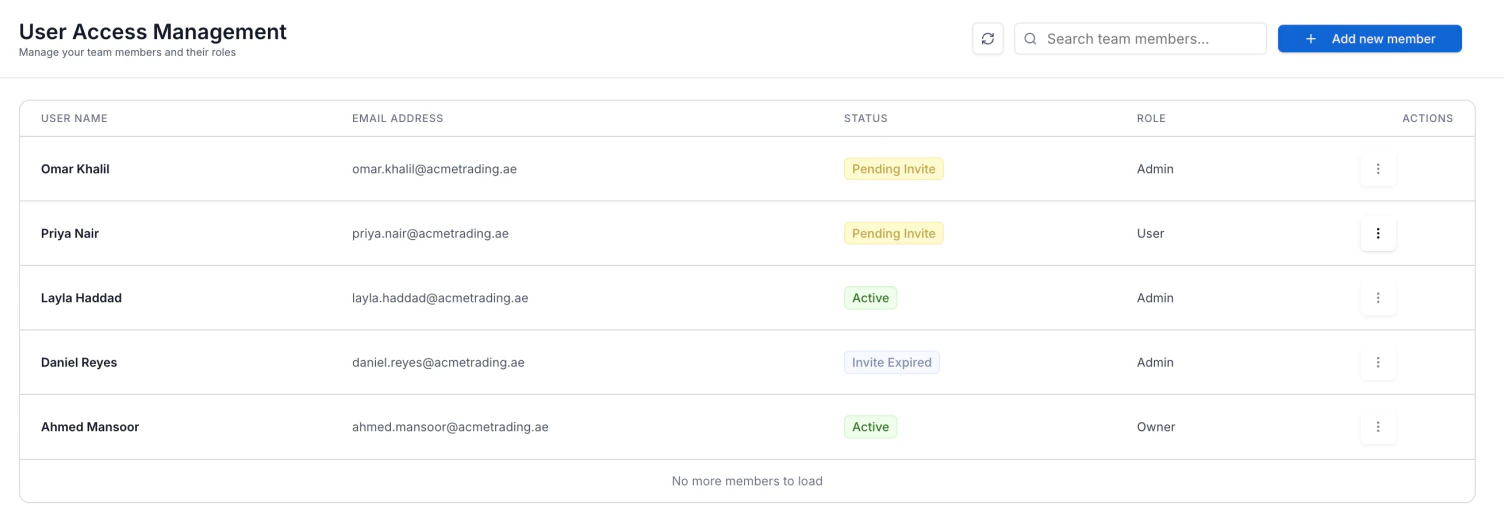
Choose Settings, then User Access Management. The table lists everyone in the workspace with their User Name, Email Address, Status and Role. Use Search team members… to find someone by name or email.
Add people
Choose Add new member. In Invite to your workspace, enter an email address and choose a role: Admin, User, Guest or Integrator. To invite several people at once, choose + to add another row.
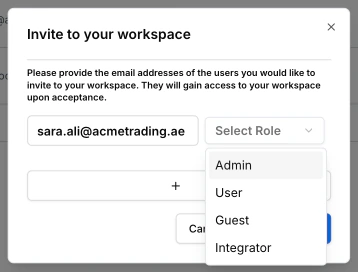
If you close the dialog after typing, you are asked to confirm. Choose Discard to close it without sending, or Keep Editing to go back.
Send the invitations
Choose Send Invites. Each row shows a tick when its invitation is sent, or an error if it failed. Choose Close when you are done.
Each person receives an email. They join the workspace when they accept it. Until then, they appear in the table as Pending Invite.
Invitations expire after 14 days. An expired invitation shows Invite Expired. To send a new one, open the row’s actions menu and choose Resend Invitation. The previous link stops working.
If your workspace limits sign-ups to approved email addresses or domains, you can only invite people who match that list.
Roles
Every teammate has one role in the workspace.
| Role | What they can do |
|---|---|
| Owner | Everything an Admin can do, plus promote and demote Admins and transfer ownership. A workspace has one Owner. |
| Admin | Manage documents, companies, branches, reports, credits and Developer portal setup. Invite teammates, promote Guests to User, demote Users to Guest, and remove Users and Guests. |
| User | Create, send and fix documents and receipts, manage master records, and view and export reports. Can see the team list but cannot invite or change anyone. |
| Guest | View documents, receipts, master records and reports, and export reports. Cannot create or change anything. |
| Integrator | Work in the Developer portal only: integrations, sources, API keys, webhooks and SFTP. Use it for a consultant or partner who sets up your integration. |
Manage a teammate
Open the actions menu (⋮) at the end of a teammate’s row. The menu shows only the actions your role allows. You cannot change your own membership, and an Admin cannot change another Admin or the Owner.

| Action | Result |
|---|---|
| Promote to Admin, Promote to User | Gives the teammate a higher role after you confirm. |
| Demote to User, Demote to Guest | Gives the teammate a lower role after you confirm. |
| Transfer Ownership | Makes the teammate the Owner. You become an Admin. Only the Owner sees this action. |
| Remove | Marks the teammate Removed and deletes them from the workspace after 30 days. For a pending invitation, it cancels the invitation. |
| Re-invite Member | Sends a new invitation to a teammate who is Removed or Inactive. They rejoin when they accept it. |
| Resend Invitation | Sends a new invitation email to someone who has not joined yet. |
Choose who gets email notifications
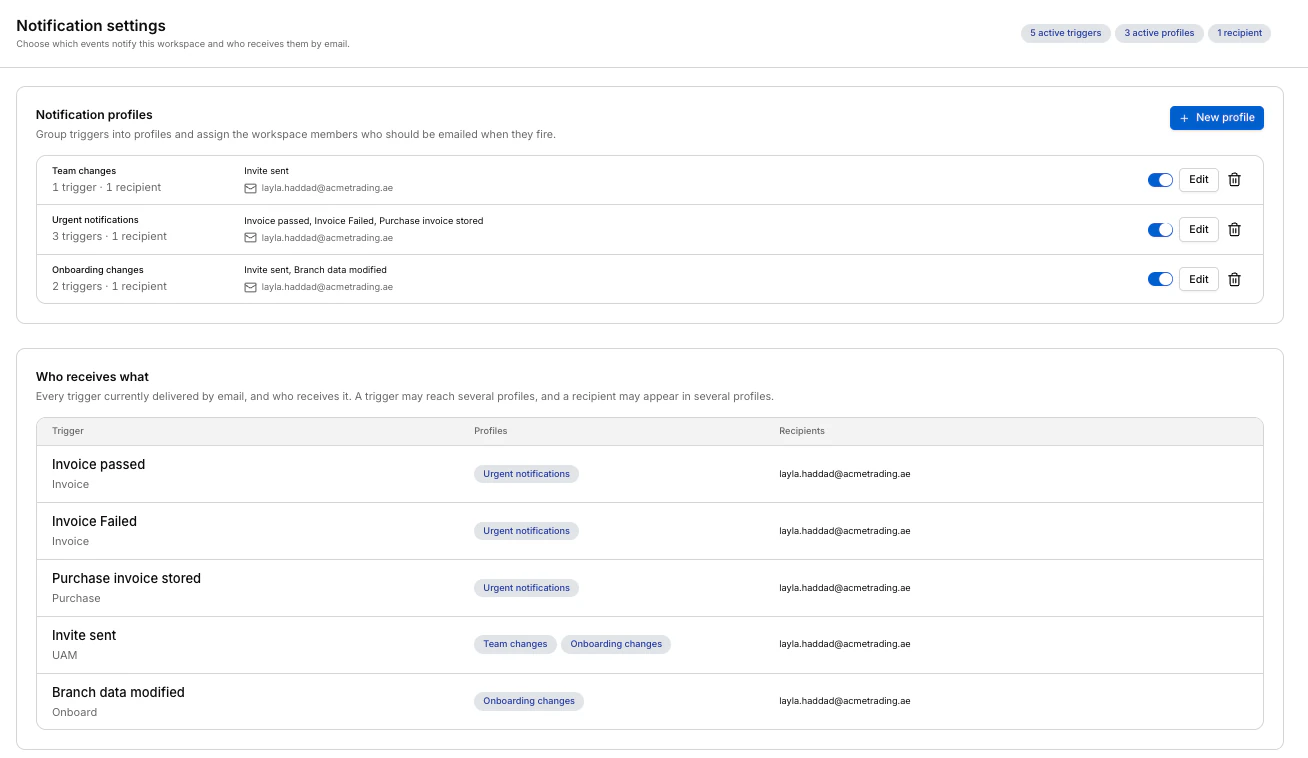
Notification settings decides which workspace events send an email, and to whom. It is available to Owners and Admins. Until you create a profile, notifications appear only in the app.
A profile groups one or more triggers with the teammates who should be emailed. When any trigger in the profile fires, every recipient in it gets an email.
Start a profile
Choose Settings, then Notification settings. Choose New profile.
Name it and pick triggers
Enter a Profile name, such as Compliance failures. Under Triggers, select the events that should send an email. The list shows the triggers available to your workspace.
Pick recipients and create it
Under Recipients, select the teammates to email. Only workspace members can receive notification emails. Choose Create profile.
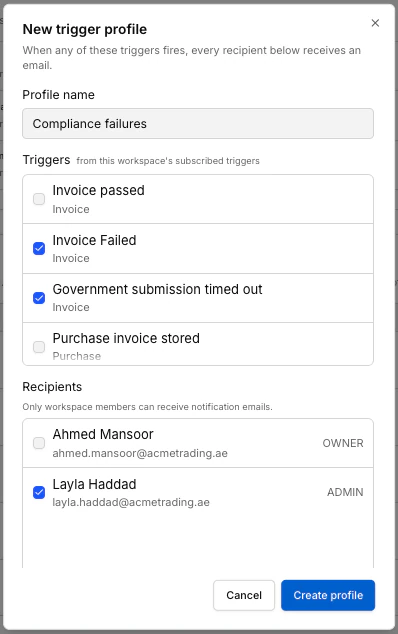
The profile appears under Notification profiles. Who receives what lists every trigger that sends email, with the profiles and recipients it reaches. A trigger can be in several profiles, and a teammate can receive it through more than one.
To pause a profile without deleting it, turn off its switch. To change it, choose Edit. To delete it, choose the bin icon and confirm. Deleting a profile is permanent.
If something goes wrong
Email not allowed. Use only whitelisted emails or domains.
Your workspace only accepts invitations to approved email addresses or domains. Invite an address that matches the list, or ask your Owner to add it.
Both email and role are required
Every row in Invite to your workspace needs an email address and a role. Fill in both, or remove the empty row.
A teammate did not get their invitation
Ask them to check their spam folder. If the invitation shows Invite Expired, or they still cannot find it, choose Resend Invitation from the row’s actions menu.
The actions menu is greyed out
You cannot change your own membership, the Owner, or, as an Admin, another Admin. Ask the Owner to make the change.
A notification profile with this name already exists.
Each profile in a workspace needs its own name. Choose a different Profile name, or edit the existing profile instead.
You are not authorized to view this page
Your role does not include this Settings page. Ask an Owner or Admin in your workspace to change your role.
Next, onboard a company so your team can start creating documents.
Last updated